The Integration Mapping page contains the mapping settings for locations, jobs, and employees for an HR management integration. This page has the same layout across all HR management integrations, including AllianceHCM, Workday, UKG, and Netchex. The legal entity mapping tab is only available for UKG and AllianceHCM integrations.
When mapping records, the mapping list can be switched between viewing HR records or R365 records. Typically, viewing the source record list (HR records) is the most efficient way to complete mappings. Switching the source record being viewed on one tab will change the view for all tabs.
From this page, users can perform the following actions:
View and edit legal entity mappings (UKG and AllianceHCM only)
Create R365 job records
View and edit employee mappings
Create R365 employee records
Security
Users with the following permission can view and edit Employee HR Management Integration mappings:
Administration → Integrations → 3rd Party HR Admin
Navigation
1) Open the Integrations page
Navigate to pages with the R365 global search bar:
Enter all or part of the page name in the R365 global search bar.
Select the page from the results list.
Only enabled pages can be searched for. If the desired page is not enabled, contact your CSM for assistance.
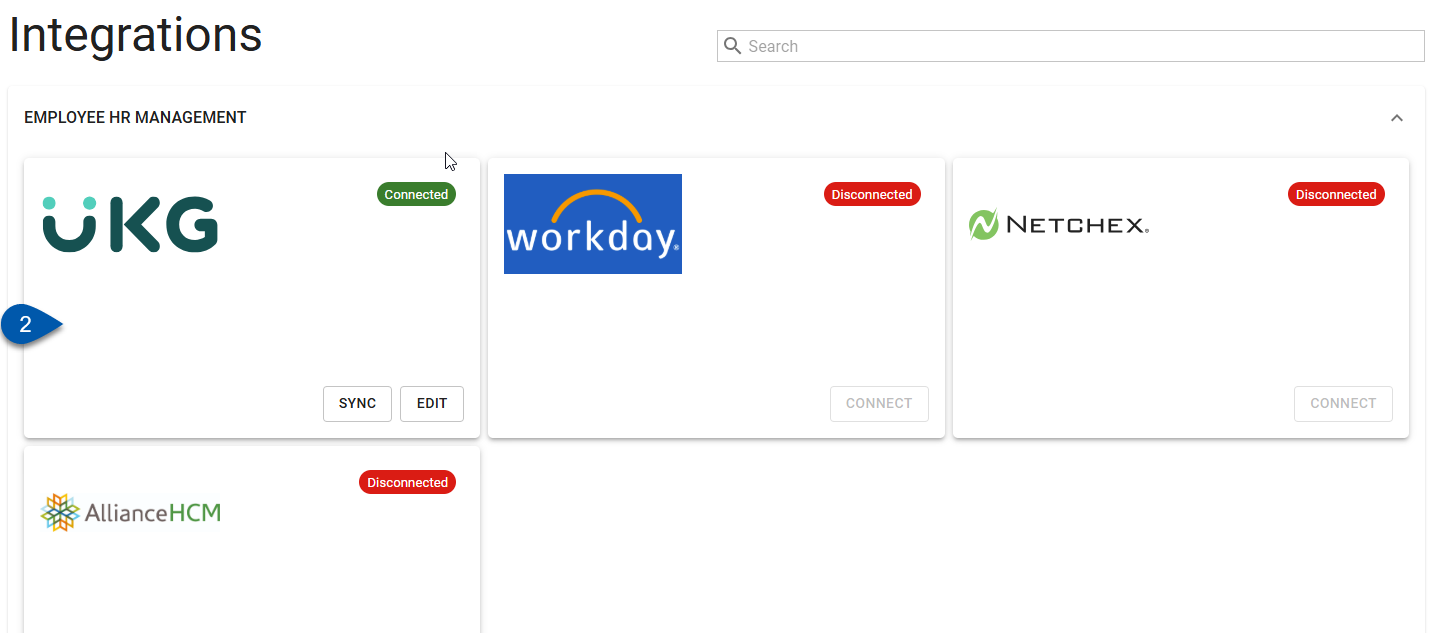
2) Under Employee HR Management, select the desired integration.
3) Click Edit Account Mapping.
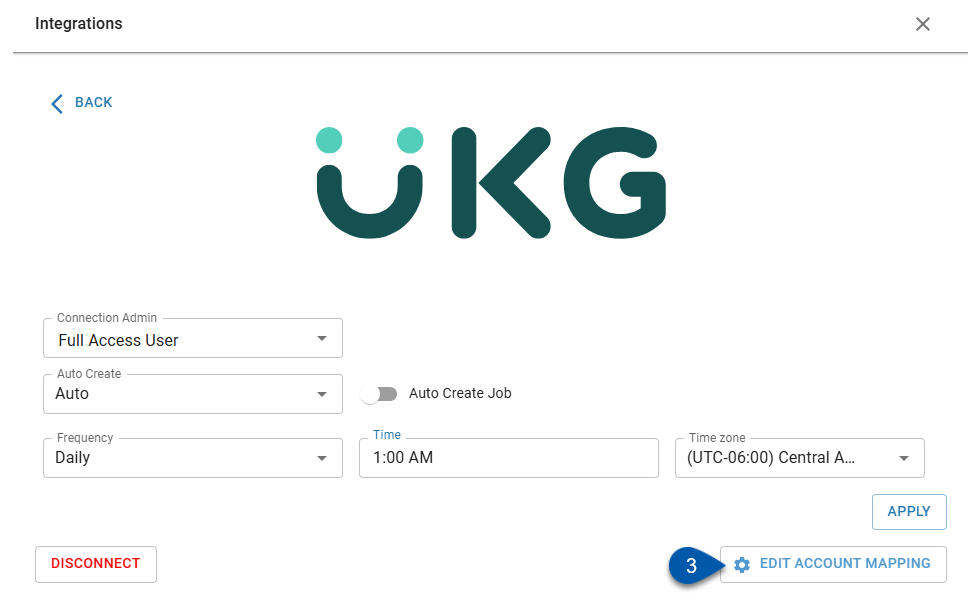
The Edit Account Mapping button is only displayed when the integration has been connected.
Mapping Screen Header

#5 not pictured - The Workday integration does not use the Legal Entity tab.
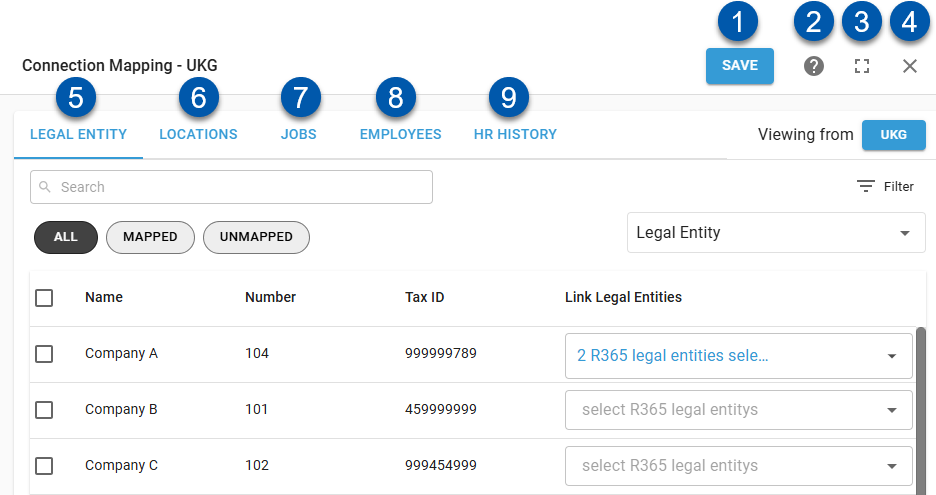
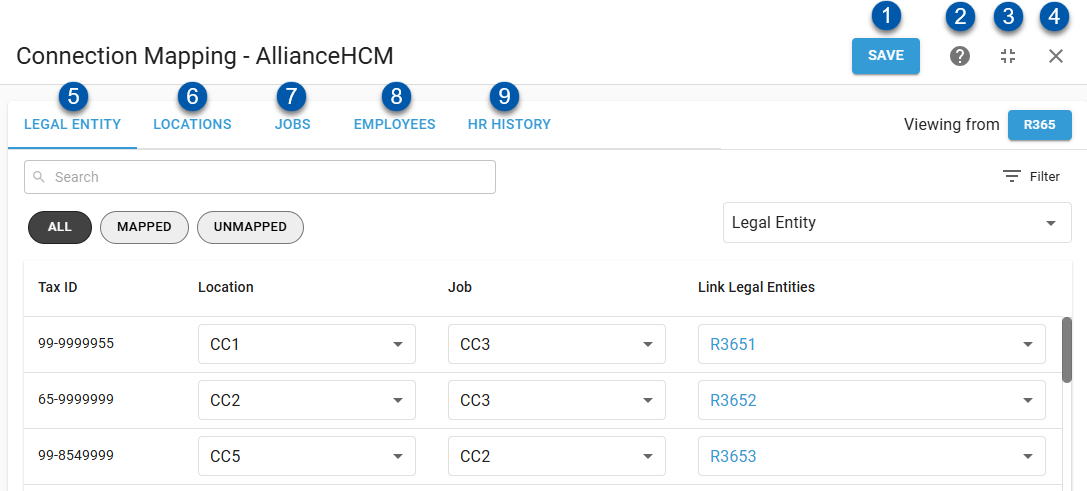
Button/Field | Description | |
|---|---|---|
1 | Save Button | Saves mappings on all tabs. |
2 | Help Button | Opens the help menu. |
3 | Expand/Collapse Button | Expands the screen to fullscreen, or collapses it if it is already expanded. |
4 | Close Button | Closes the Mapping screen without saving changes. |
5 | Legal Entity Tab | Displays the mappings for legal entities. Here, legal entity mappings can be viewed and edited.
|
6 | Locations Tab | Displays the mappings for locations. Here, location mappings can be viewed and edited. |
7 | Jobs Tab | Displays the mappings for jobs. Here, job mappings can be viewed and edited, and new R365 job records can be created. |
8 | Employees Tab | Displays the mappings for employees. Here, employee mappings can be viewed and edited, and new R365 employee records can be created. |
9 | HR History Tab | Displays the history for employee and job syncs between R365 and the source HR system. |
Legal Entity Tab
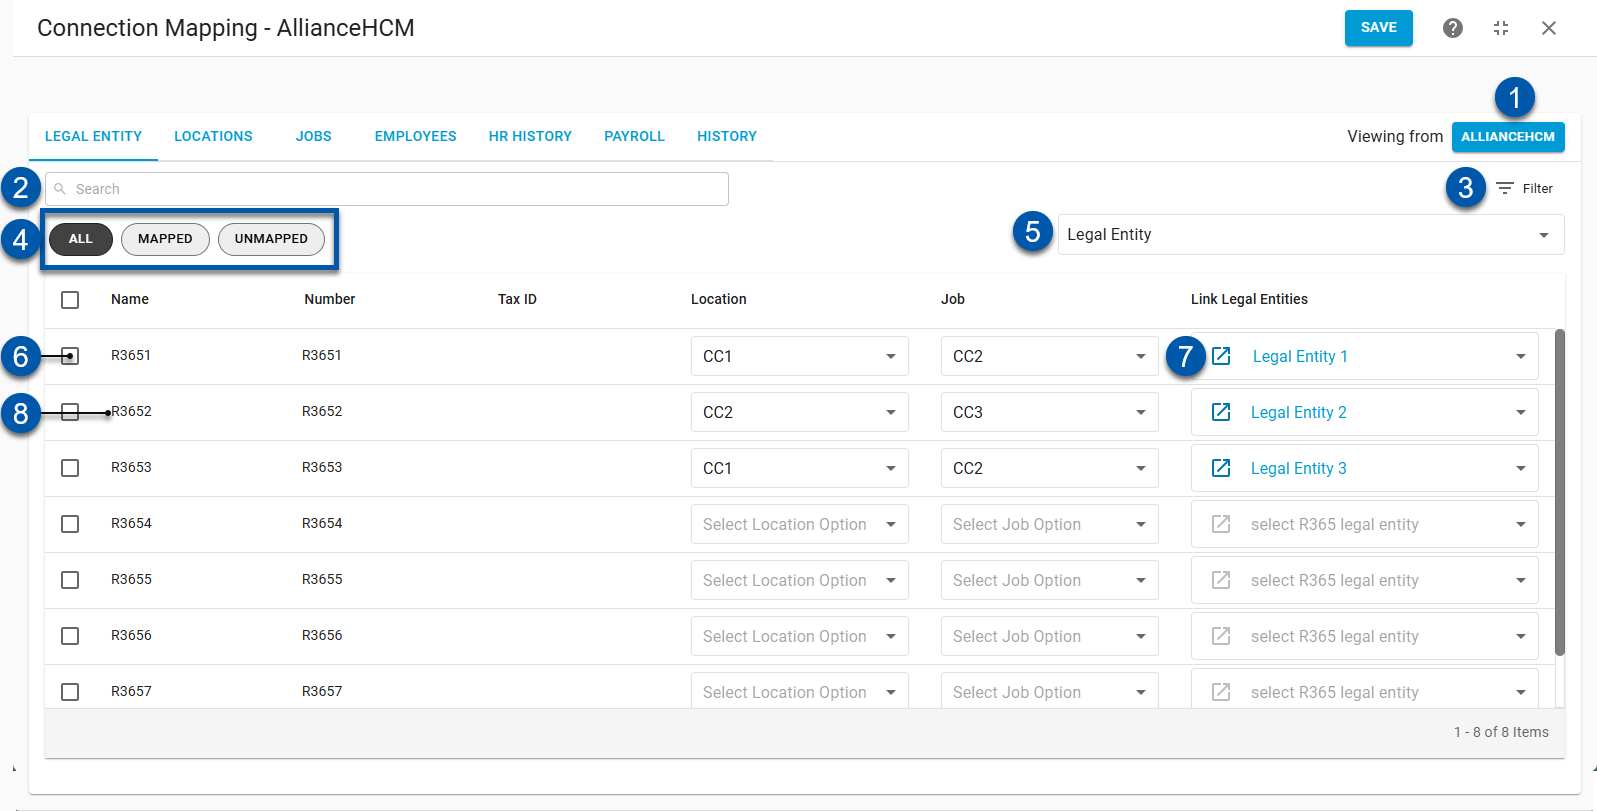
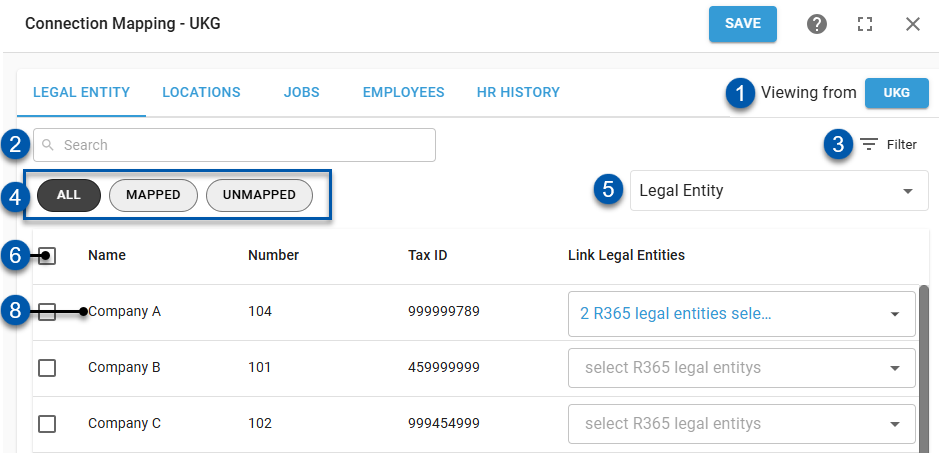
#7 not pictured - The UKG integration does not use the Open Legal Entity Button.
Button/Field | Description | |
|---|---|---|
1 | Viewing From [System] Button | Sets the record source for the displayed legal entities.
Click to switch the record source. |
2 | Search | Filters the grid for the entered text. |
3 | Filter | Opens the filter columns window where users can create and apply filters to the table. |
4 | Quick Filters | Filters the displayed records based on the following mapping statuses:
|
5 | Legal Entity / Reporting Category Selector | Filters the list of R365 legal entities to show all legal entities or those grouped by the selected location reporting category.
|
6 | Bulk Select Checkbox | Selects the legal entity and opens the bulk action menu. |
7 | Open Legal Entity Button | Opens the associated R365 legal entity record. This button is only displayed when viewing HR system records. |
8 | Legal Entity Row | Legal entity details and mapping. |
AllianceHCM Columns
Column | Description |
|---|---|
Name | Legal entity/company name as it appears in the source record. |
Number | Legal entity/company number as it appears in the source record. |
Tax ID | Tax ID as it appears in the source record. |
Location | The AllianceHCM cost center used to identify AllianceHCM locations linked to the AllianceHCM legal entity. |
Job | The AllianceHCM cost center used to identify jobs linked to the AllianceHCM legal entity. |
Link Legal Entities | Legal entity mapped to the source record. When R365 records are displayed, indicates the mapped AllianceHCM legal entity/company. When AllianceHCM records are displayed, indicates the mapped R365 legal entity. Click to change the associated legal entity mapping. |
UKG Columns
Column | Description |
|---|---|
Name | Legal entity/company name as it appears in the source record. |
Number | Legal entity/company number as it appears in the source record. |
Tax ID | Tax ID as it appears in the source record. |
Link Legal Entities | Legal entity mapped to the source record. When R365 records are displayed, indicates the mapped UKG legal entity/company. When UKG records are displayed, indicates the mapped R365 locations. Click to change the associated legal entity mapping. |
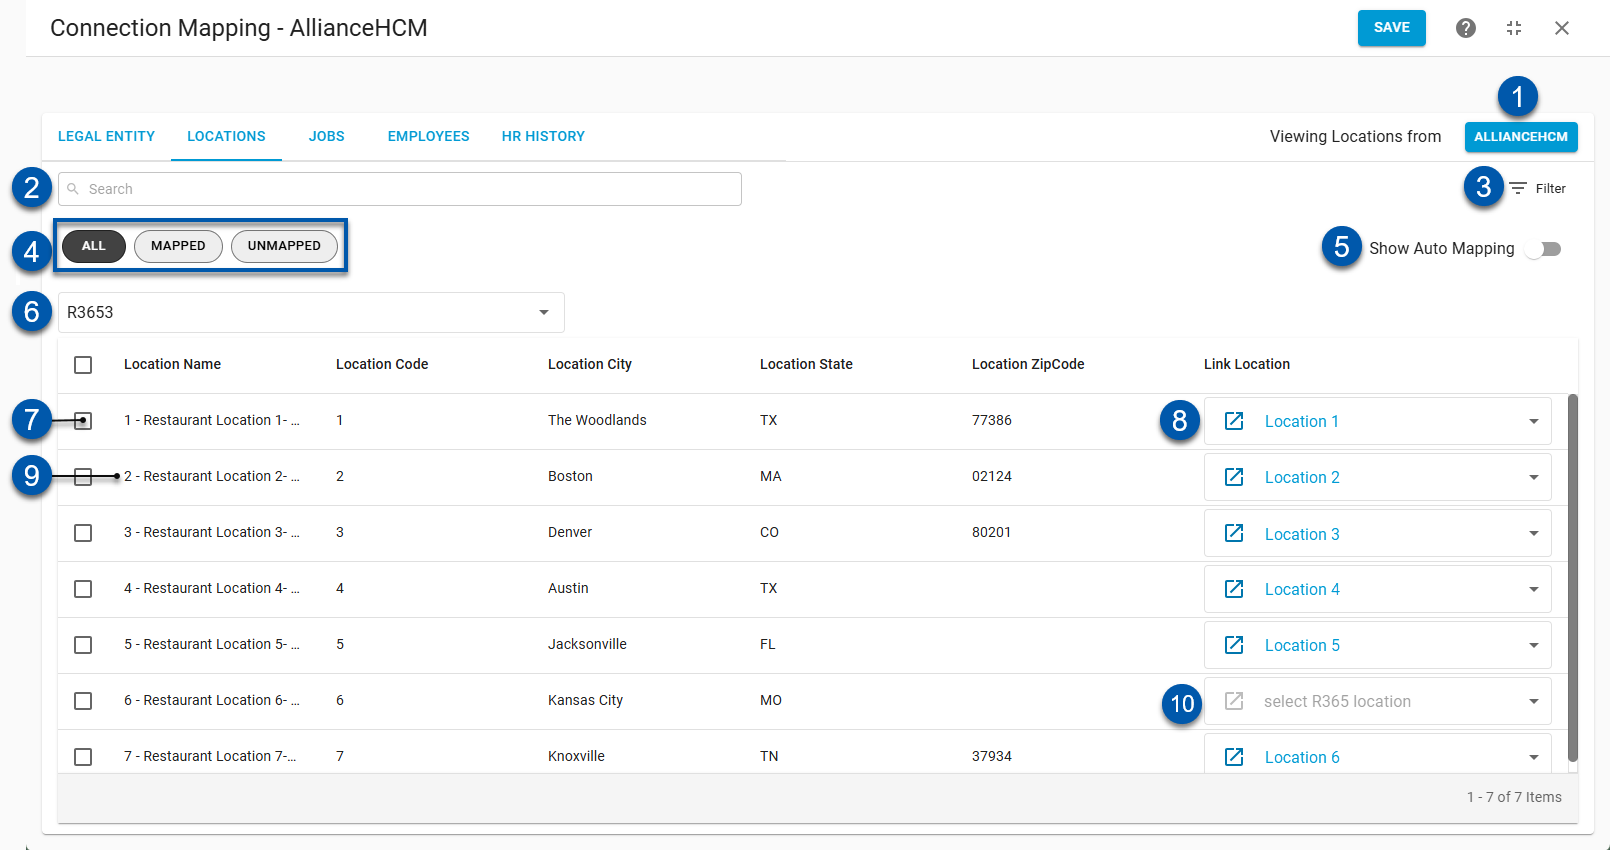
Locations Tab
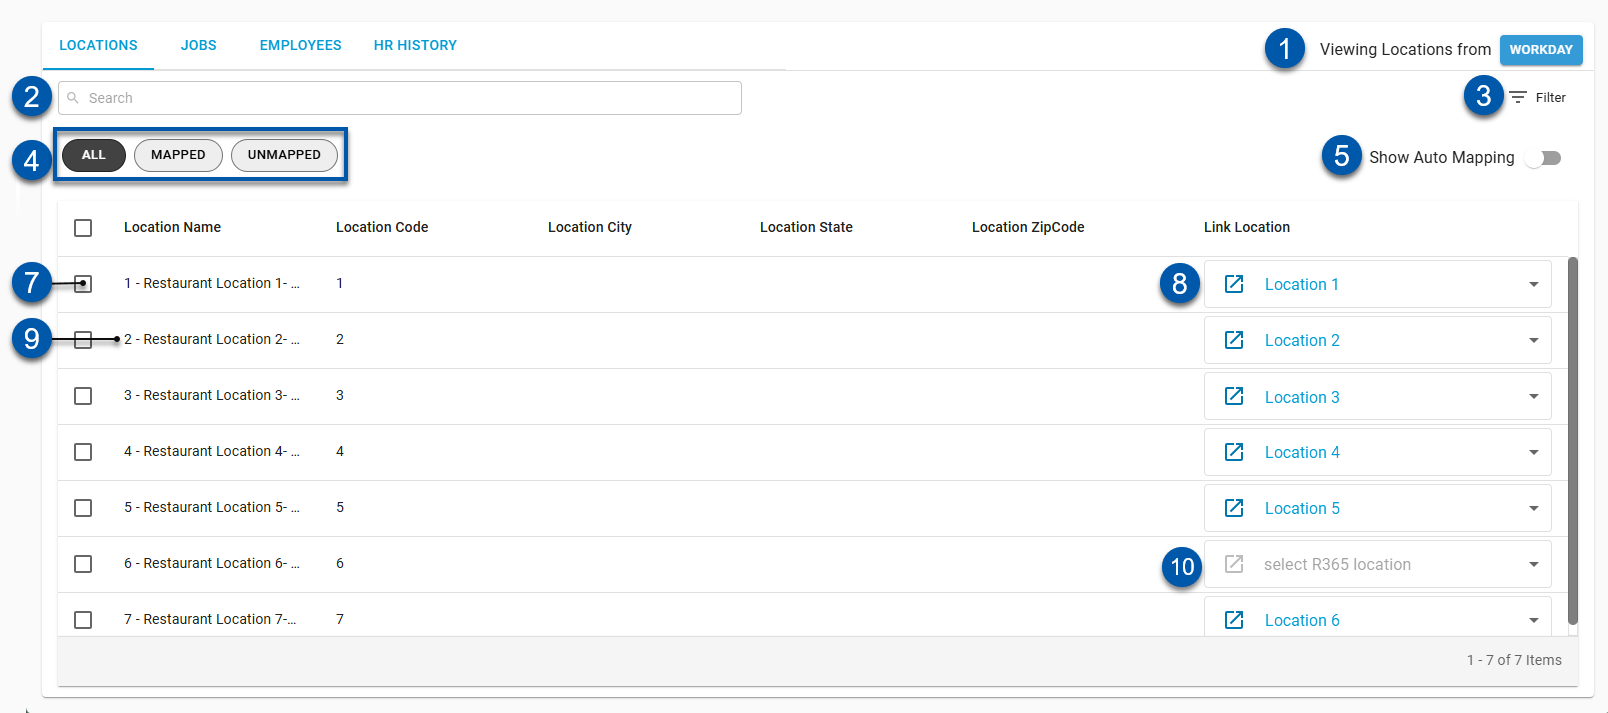
#6 not pictured - The Workday integration does not use the Legal Entity Selector.

#6 not pictured - The UKG integration does not use the Legal Entity Selector.
Button/Field | Description | |
|---|---|---|
1 | View Locations From [System] Button | Indicates the record source for displayed locations:
Click to switch the record source. |
2 | Search | Filters the grid for the entered text. |
3 | Filter | Opens the filter columns window where users can create and apply filters to the table. |
4 | Quick Filters | Filters the displayed records based on the following mapping statuses:
|
5 | Show Auto Mapping | Shows or hides locations that have been automatically mapped. |
6 | Legal Entity Selector | Indicates the legal entity associated with the displayed locations.
|
7 | Bulk Edit Selector | Selects the location for bulk editing. When one or more locations are selected, the bulk edit button is displayed in the lower right. |
8 | Location Row | Location details and mapping. |
9 | Mapped Location | Linked location as it appears when mapped.
Click to change the associated location mapping. |
10 | Unmapped Location | Linked location as it appears when unmapped.
Click to map the associated location. |
Locations Grid Columns
The Locations grid has the following columns:
Column | Description |
|---|---|
Location Name | Name of the location as it appears in the source record. |
Location Code | Location code as it appears in the source record. |
Location City | Location city as it appears in the source record.
|
Location State | Location state as it appears in the source record.
|
Location Zip Code | Location zip code as it appears in the source record.
|
Link Location | Location mapped to the source record. When R365 records are displayed, indicates the mapped HR system location. When HR system records are displayed, indicates the mapped R365 locations. Click to change the associated location mapping. |
Jobs Tab
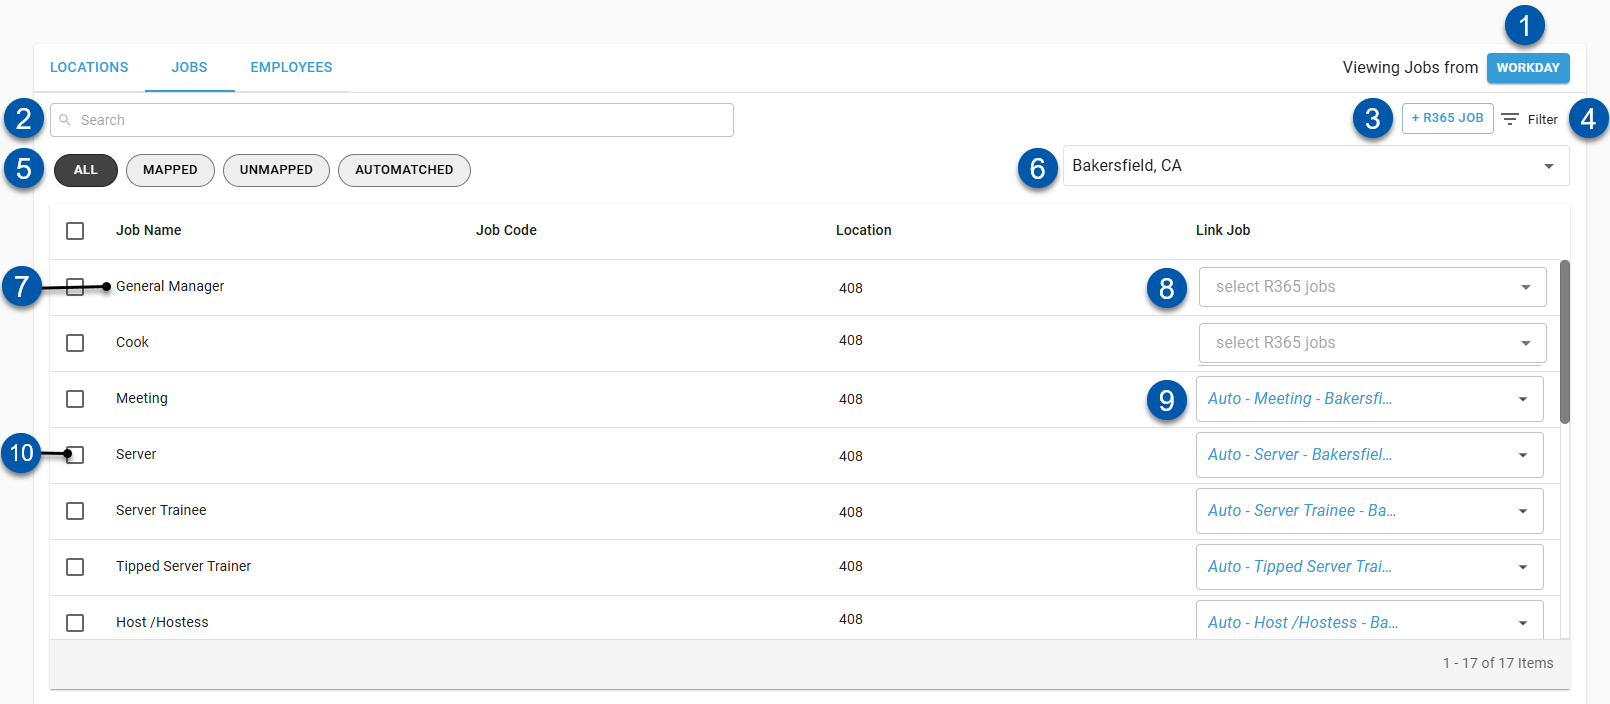
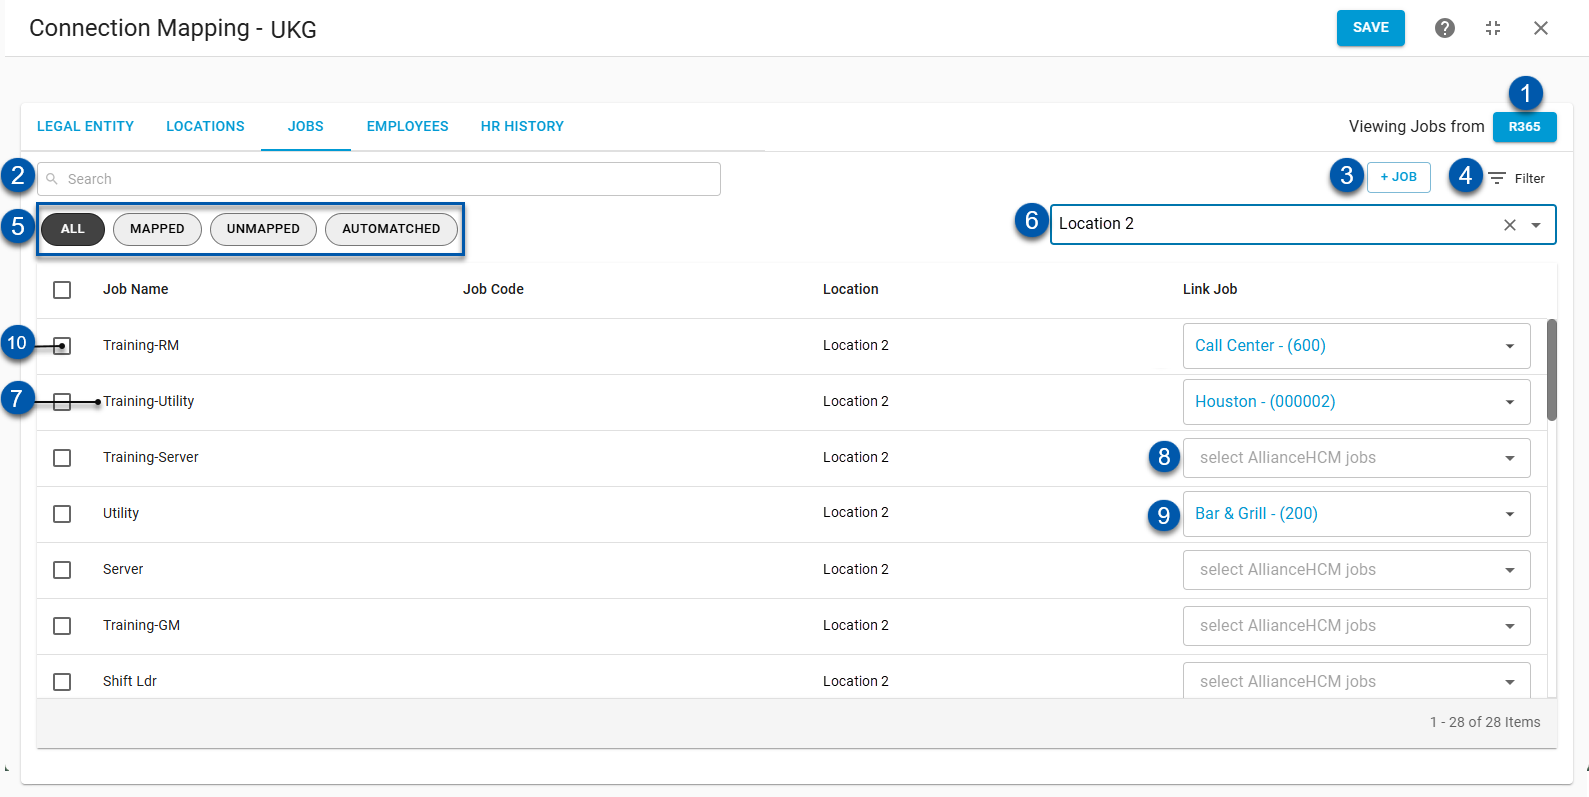
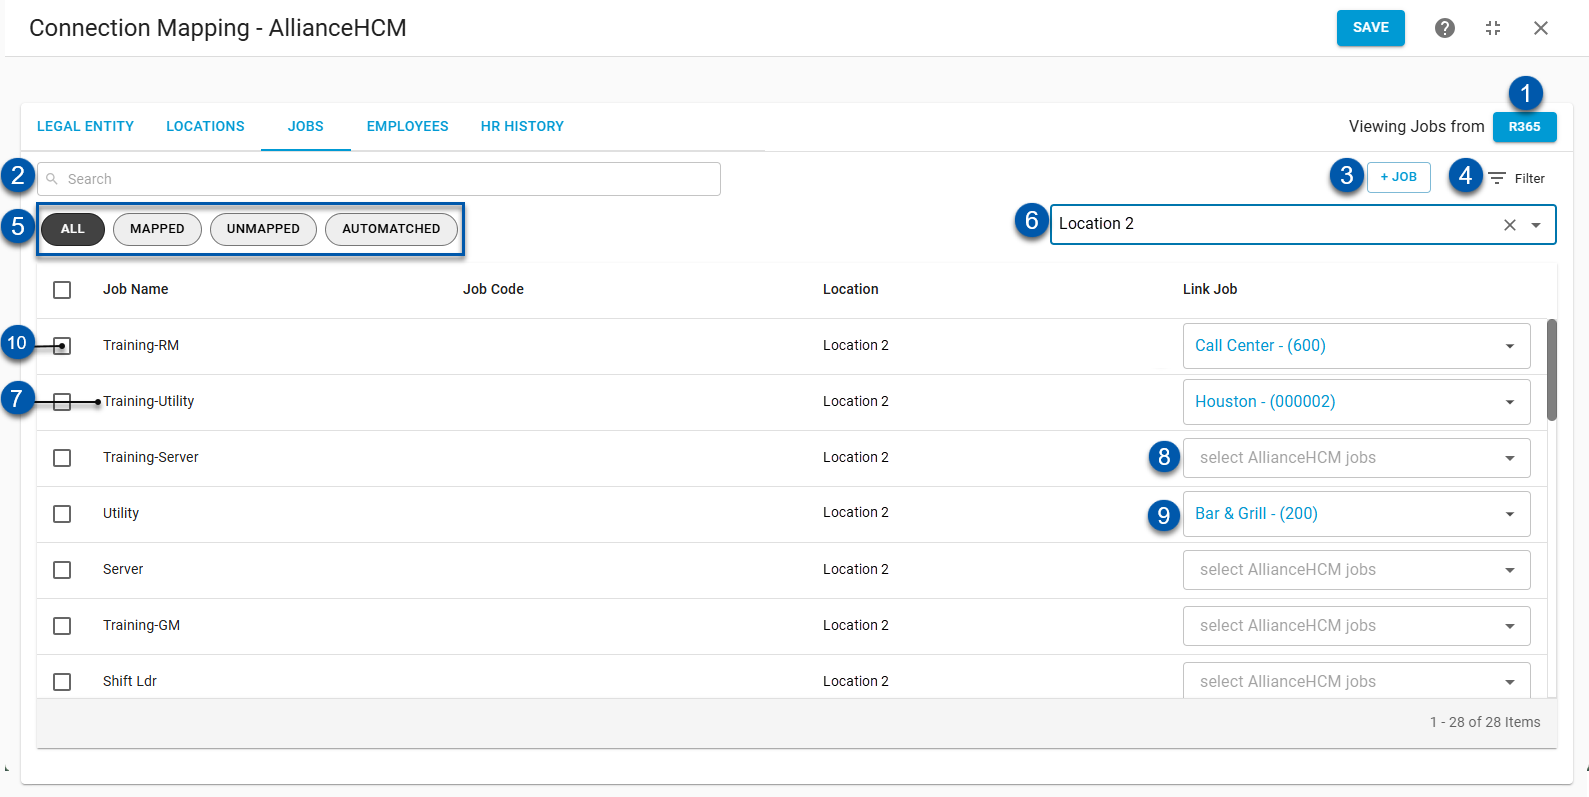
Button/Field | Description | |
|---|---|---|
1 | View Jobs From [System] Button | Indicates the record source for displayed jobs:
Click to switch the record source. |
2 | Search | Filters the grid for the entered text. |
3 | +Add R365 Job | Opens a blank R365 job record.
|
4 | Filter | Opens the filter columns window where users can create and apply filters to the table. |
5 | Quick Filters | Filters the displayed records based on if they are mapped:
|
6 | Location Selector | Indicates the location associated with the displayed jobs.
|
7 | Job Row | Job details and mapping. |
8 | Unmapped Job | Linked job as it appears when unmapped.
Click to map the associated job. |
9 | Mapped Job | Linked job as it appears when mapped.
Click to change the associated job mapping. |
10 | Bulk Edit Selector | Selects the job for bulk editing. When one or more jobs are selected, the bulk edit button is displayed in the lower right. |
Job Columns
Column | Description |
|---|---|
Job Name | Name of the job as it appears in the source record. |
Job Code | Job code as it appears in the source record. |
Location | Source location associated with the source record. |
Link Job | Job mapped to the source record.
Click to change the associated job mapping.
|
Employees Tab
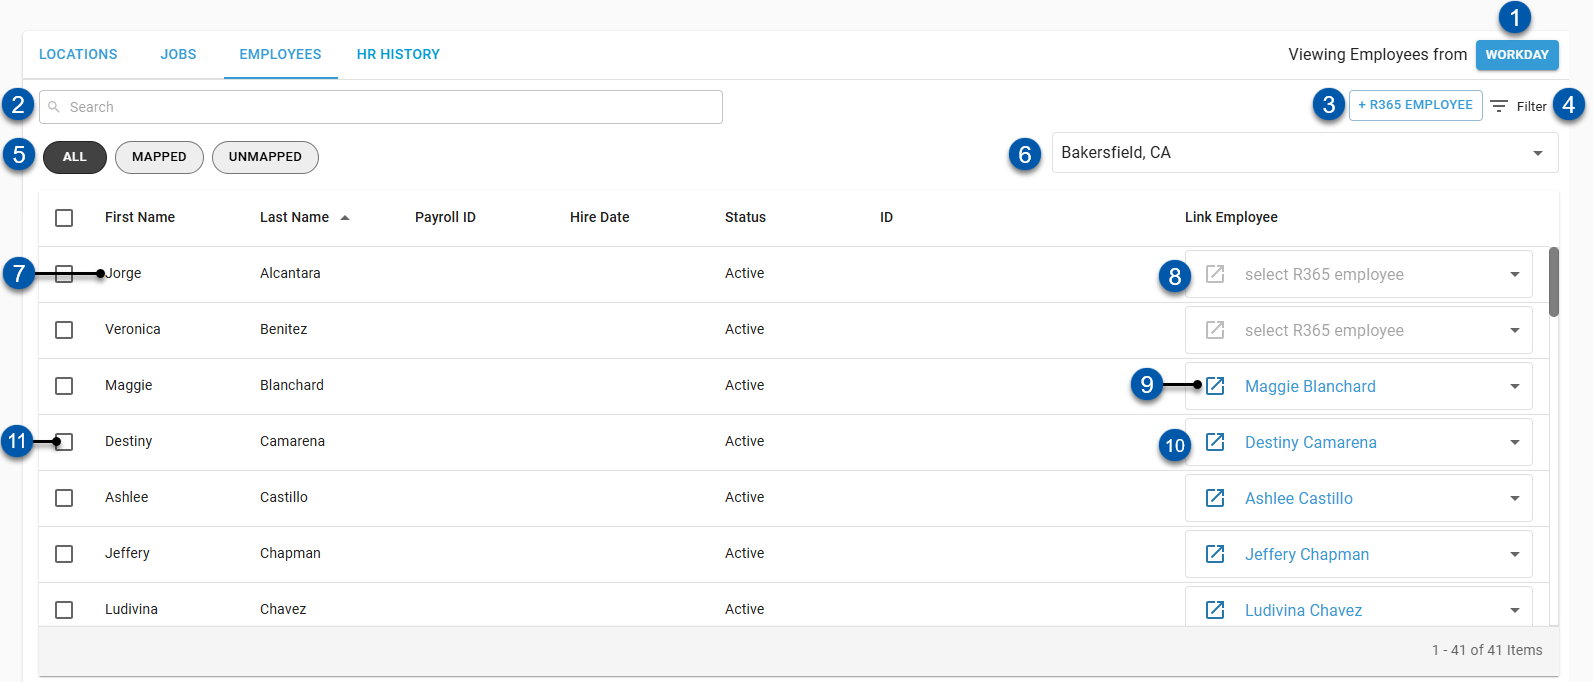
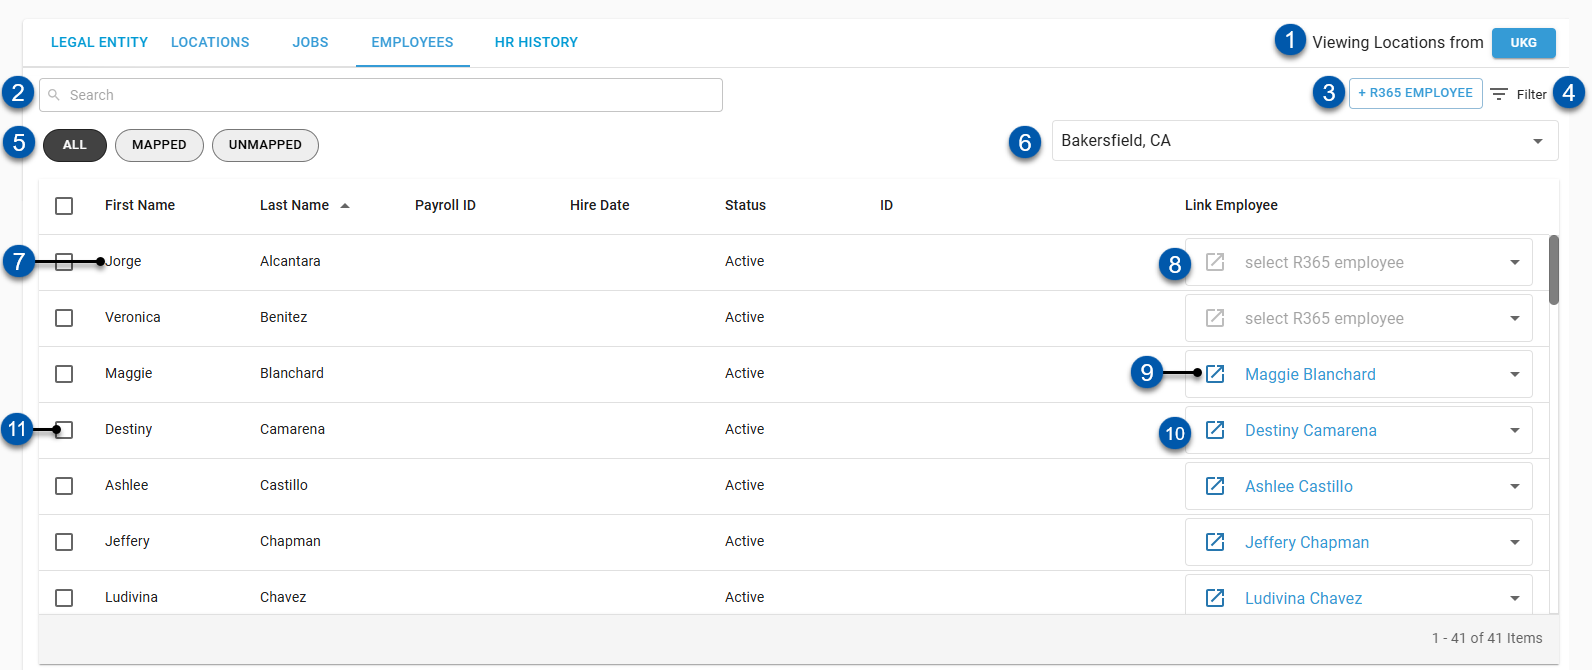
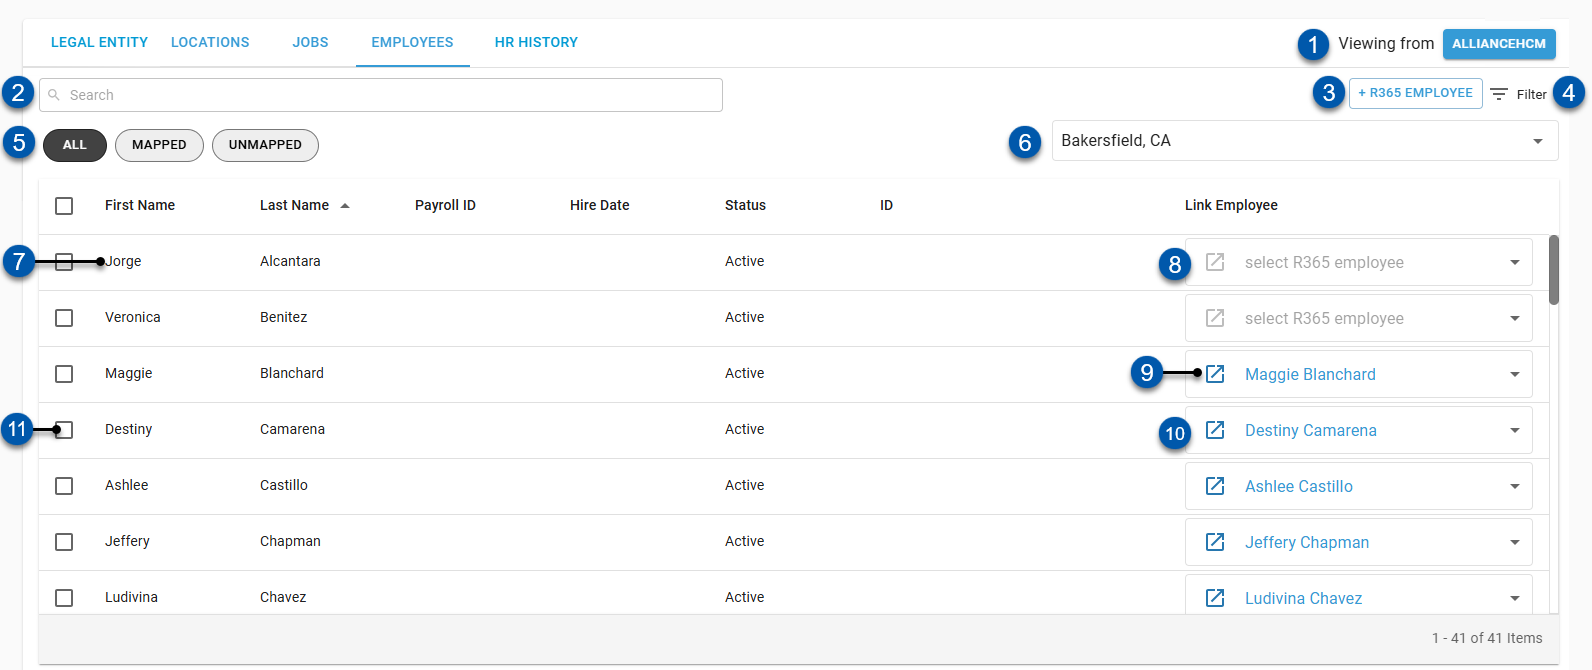
Button/Field | Description | |
|---|---|---|
1 | View Location From [System] Button | Indicates the record source for displayed employees:
Click to switch the record source. |
2 | Search | Filters the grid for the entered text. |
3 | +Add (R365) Employee | Opens a blank R365 employee record in a sidesheet. Learn more about creating employee records.
|
4 | Filter | Opens the filter columns window where users can create and apply filters to the table. |
5 | Quick Filters | Filters the displayed records based on the following mapping statuses:
|
6 | Location Selector | Indicates the location associated with the displayed employees.
|
7 | Employee Row | Employee details and mapping. |
8 | Unmapped Employee | Linked employee as it appears when unmapped.
Click to map the associated employee. |
9 | Mapped Employee | Linked employee as it appears when mapped.
Click to change the associated employee mapping. |
10 | Employee Record Button | Opens the mapped R365 employee record in a new tab. |
11 | Bulk Edit Selector | Selects the employee for bulk editing. When one or more employees are selected, the bulk edit button is displayed in the lower right. |
Employees Columns
Column | Description |
|---|---|
First Name | Employee’s first name as it appears in the source record. |
Last Name | Employee’s last name as it appears in the source record. |
Payroll ID | Employee’s HR system employee ID. |
Hire Date | Hire date as it appears in R365. |
Status | Active status for the employee as it appears in the source record. |
ID | The employee’s unique ID for the source record.
|
Link Employee | Employees mapped to the source record.
Click to change the associated employee mapping.
|
HR History Tab
The HR History tab displays information for each sync between R365 and the HR system.
Each row represents an individual sync.
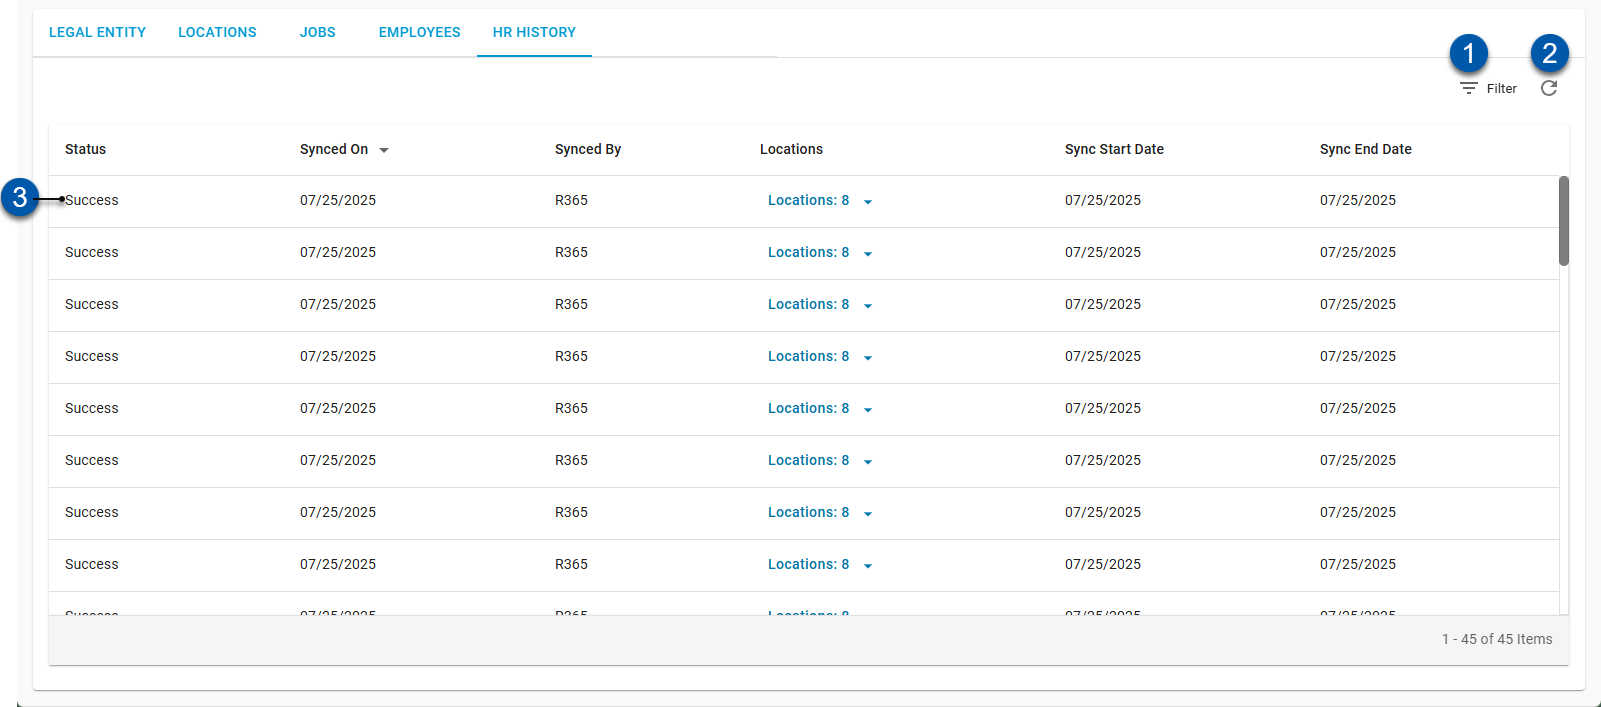
Buttons and Fields
Button/Field | Description | |
|---|---|---|
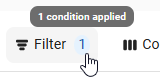
1 | Filter | Filter - Opens the Filter menu, where filters based on column values can be applied. When filters are applied, the number of conditions is displayed next to the button.
|
2 | Refresh | Refreshes the table with the latest sync information. |
3 | Sync Row | Displays a summary of the sync details. Click to open the Sync Dialog which displays a detailed list of the jobs and employees included in the sync. |
Columns
Column | Description |
|---|---|
Status | Displays the status of the sync. Statuses include:
|
Synced On | The date of the sync. |
Synced By | The user who initiated the sync. |
Locations | The locations included in the sync. |
Sync Start Date | The start date of the sync. |
Sync End Date | The end date of the sync. |
Sync Dialog Details
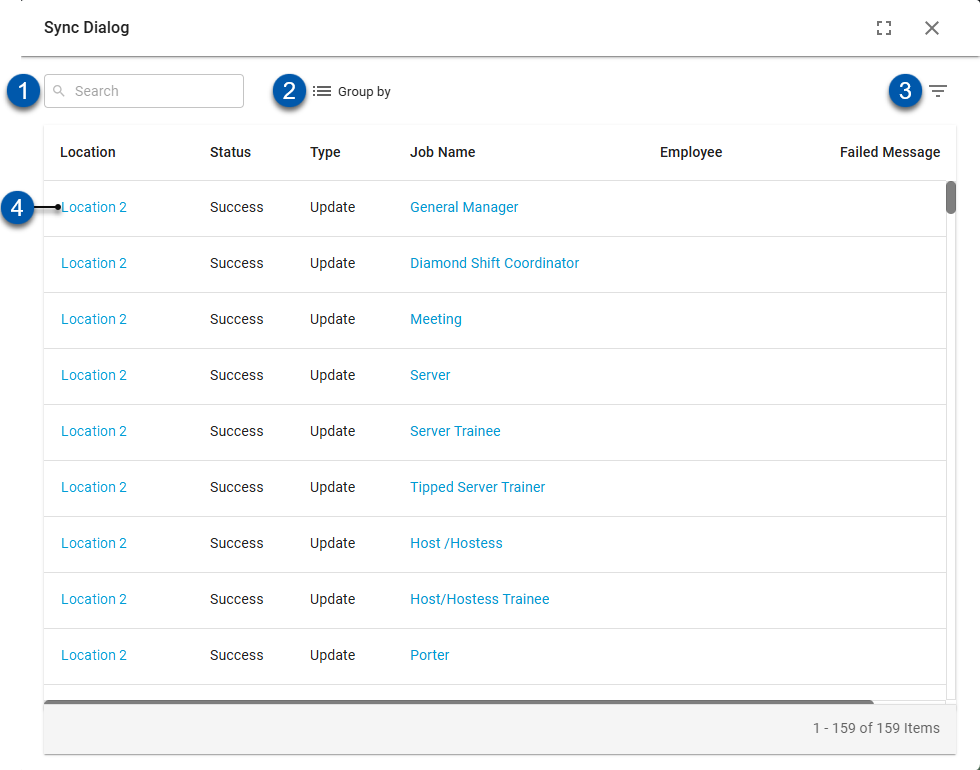
Buttons and Fields
Button/Field | Description | |
|---|---|---|
1 | Search | Search - Filters the table for the entered text in the following columns:
|
2 | Group By | Group - Opens the Group menu, where table grouping can be switched between the following options:
|
3 | Filter | Filter - Opens the Filter menu, where filters based on column values can be applied. When filters are applied, the number of conditions is displayed next to the button.
|
4 | Sync Detail Row | Displays the details for the job or employee synced. |
Columns
Column | Description |
|---|---|
Location | The location of the sync. Click to open the location record. |
Status | Displays the status of the sync. Statuses include:
|
Type | The type of sync. Types include:
|
Job Name | The name of the job included in the sync. Click the job name to open the job record. |
Employee | The name of the employee. Click the employee’s name to open their employee record. |
Failed Message | Displays the error that prevented the sync from being successful. |