The Workday Mapping page contains the mapping settings for locations, jobs, and employees for the Workday integration.
When mapping records, the mapping list can be switched between viewing Workday records or R365 records. Typically, viewing the source record list (Workday records) is the most efficient way to complete mappings. Switching the source record being viewed on one tab will change the view for all tabs.
From this page, users can perform the following actions:
Security
Users with the following permission can view and edit Workday mappings:
Administration → Integrations → 3rd Party HR Admin
Navigation
Open the Integrations page.
Locate the Workday integration, then click Edit.
Click Edit Account Mapping.
The Edit Account Mapping button is only displayed when the Workday integration has been connected.
Header
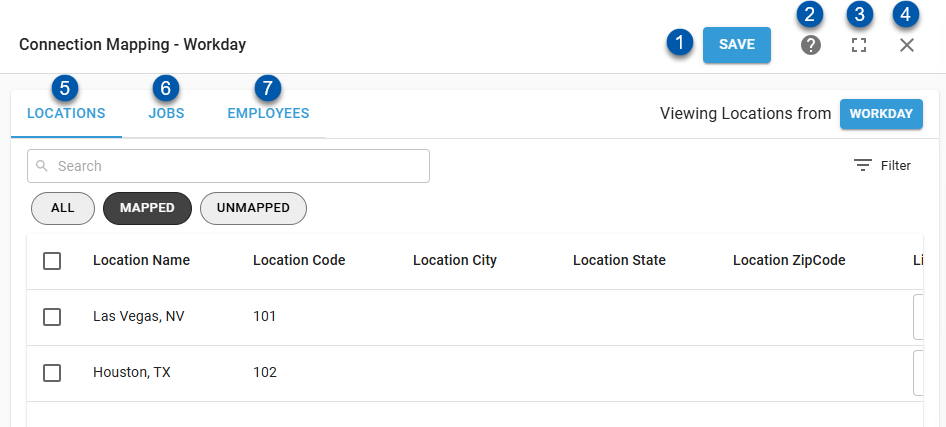
Button/Field | Description | |
|---|---|---|
1 | Save Button | Saves mappings on all tabs. |
2 | ? Help Button | Opens the help menu. |
3 | Expand/Collapse Button | Expands the sidesheet to full page, or collapses it if it is already expanded. |
4 | Close Button | Closes the Mapping page without saving changes. |
5 | Locations Tab | Displays the mappings for locations. Here, location mappings can be viewed and edited. |
6 | Jobs Tab | Displays the mappings for jobs. Here, job mappings can be viewed and edited, and new R365 job records can be created. |
7 | Employees Tab | Displays the mappings for employees. Here, employee mappings can be viewed and edited, and new R365 employee records can be created. |
Locations Tab
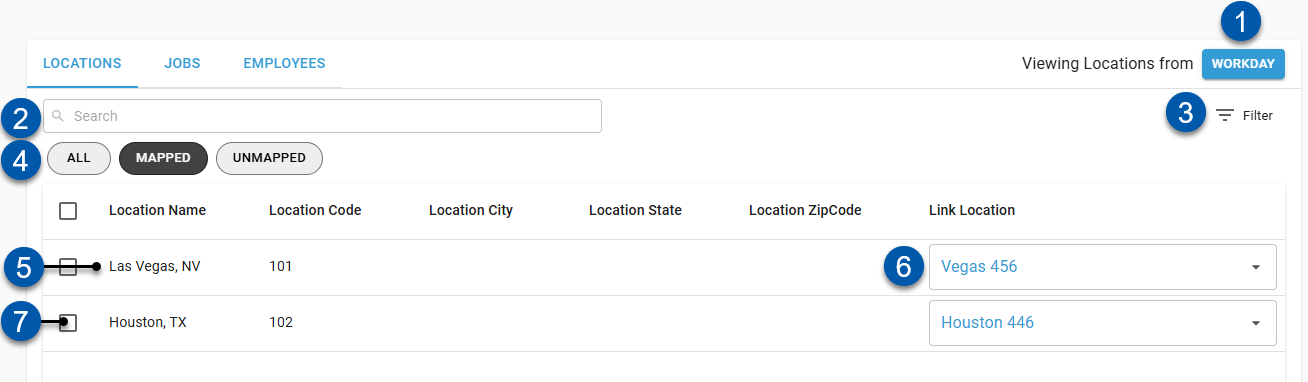
Button/Field | Description | |
|---|---|---|
1 | View Locations From ___ Button | Indicates the record source for displayed locations:
Click to switch the record source. |
2 | Search | Filters the grid for the entered text. |
3 | Filter | Opens the Filter Columns window where users can create and apply filters to the table. |
4 | Quick Filters | Filters the displayed records based on if they are mapped:
|
5 | Location Row | Location details and mapping. |
6 | Unmapped Location | Linked location as it appears when unmapped.
Click to map the associated location. |
7 | Mapped Location | Linked location as it appears when mapped.
Click to change the associated location mapping. |
8 | Bulk Edit Selector | Selects the location for bulk editing. When one or more locations are selected, the bulk edit button is displayed in the lower right. |
Location Columns
The Locations grid has the following columns:
Column | Description |
|---|---|
Location Name | Name of the location as it appears in the source record. |
Location Code | Location code as it appears in the source record. |
Location City | Location city as it appears in the source record.
|
Location State | Location state as it appears in the source record.
|
Location ZipCode | Location Zipcode as it appears in the source record.
|
Link Location | Location mapped to the source record. When R365 records are displayed, indicates the mapped Workday location. When Workday records are displayed, indicates the mapped R365 locations. Click to change the associated location mapping. |
Jobs Tab
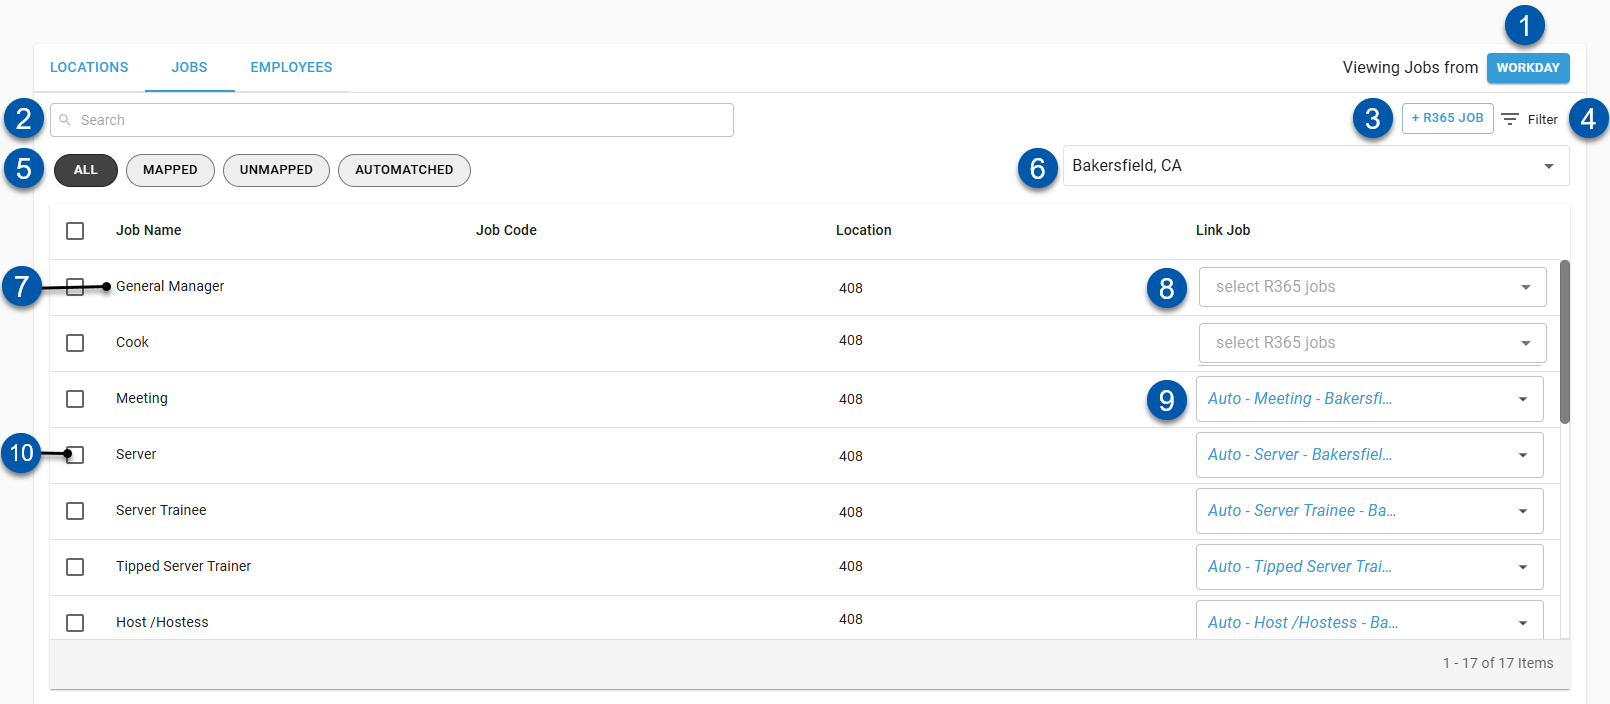
Button/Field | Description | |
|---|---|---|
1 | View Jobs From ___ Button | Indicates the record source for displayed jobs:
Click to switch the record source. |
2 | Search | Filters the grid for the entered text. |
3 | +Add R365 Job | Opens a blank R365 job record in a sidesheet.
|
4 | Filter | Opens the Filter Columns window where users can create and apply filters to the table. |
5 | Quick Filters | Filters the displayed records based on if they are mapped:
|
6 | Location Selector | Indicates the location associated with the displayed jobs.
|
7 | Job Row | Job details and mapping. |
8 | Unmapped Job | Linked job as it appears when unmapped.
Click to map the associated job. |
9 | Mapped Job | Linked job as it appears when mapped.
Click to change the associated job mapping. |
10 | Bulk Edit Selector | Selects the job for bulk editing. When one or more jobs are selected, the bulk edit button is displayed in the lower right. |
Job Columns
Column | Description |
|---|---|
Job Name | Name of the job as it appears in the source record. |
Job Code | Job code as it appears in the source record. |
Location | Source location associated with the source record. |
Link Job | Job mapped to the source record.
Click to change the associated job mapping.
|
Employees Tab
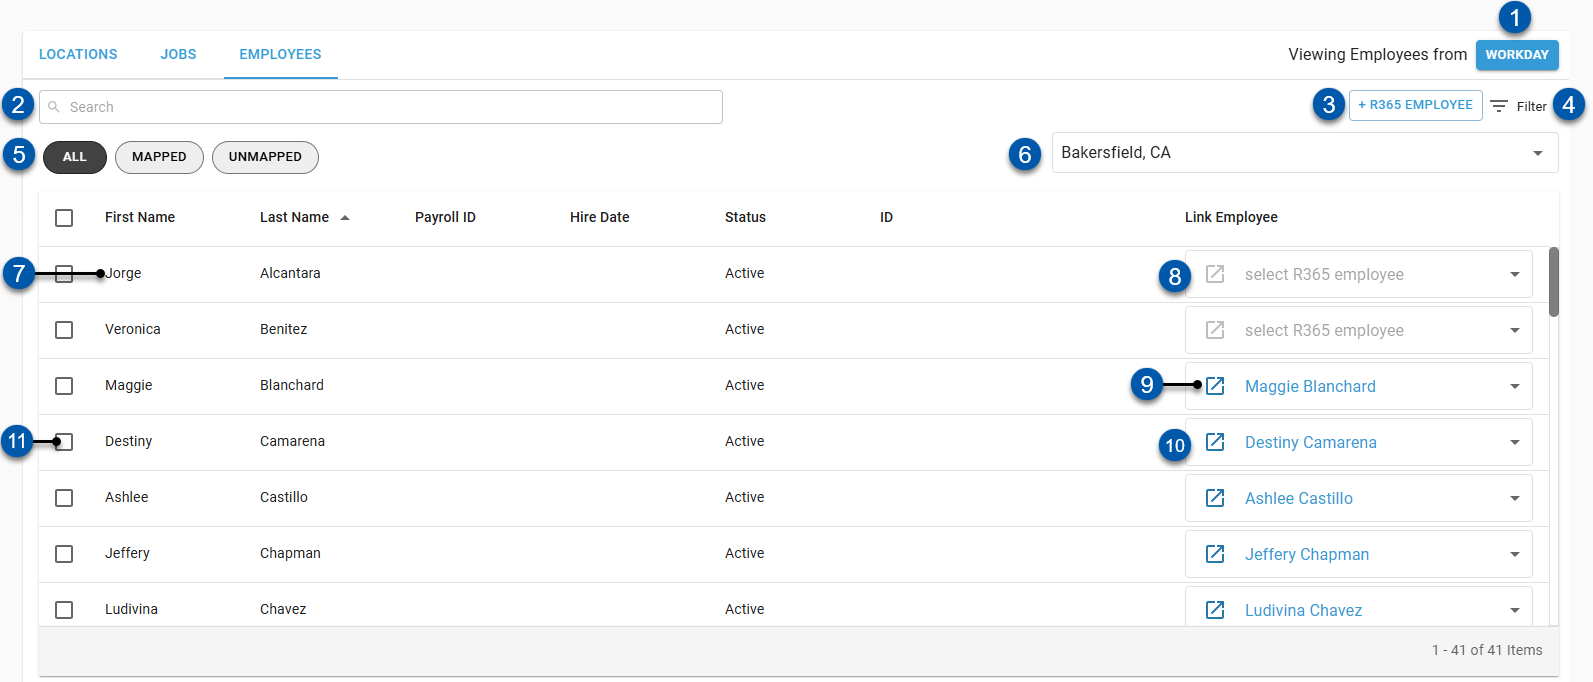
Button/Field | Description | |
|---|---|---|
1 | View Location From ___ Button | Indicates the record source for displayed employees:
Click to switch the record source. |
2 | Search | Filters the grid for the entered text. |
3 | +Add (R365) Employee | Opens a blank R365 employee record in a sidesheet. Learn more about creating employee records.
|
4 | Filter | Opens the Filter Columns window where users can create and apply filters to the table. |
5 | Quick Filters | Filters the displayed records based on if they are mapped:
|
6 | Location Selector | Indicates the location associated with the displayed employees.
|
7 | Employee Row | Employee details and mapping. |
8 | Unmapped Employee | Linked employee as it appears when unmapped.
Click to map the associated employee. |
8 | Mapped Employee | Linked employee as it appears when mapped. When R365 records are displayed, indicates the mapped Workday employee. When Workday records are displayed, indicates the mapped R365 employee. Click to change the associated employee mapping. |
9 | Employee Record Button | Opens the mapped R365 employee record in a new tab. |
10 | Mapped Employee | Linked employee as it appears when mapped. When R365 records are displayed, indicates the mapped Workday employee. When Workday records are displayed, indicates the mapped R365 employee. Click to change the associated employee mapping. |
11 | Bulk Edit Selector | Selects the employee for bulk editing. When one or more employees are selected, the bulk edit button is displayed in the lower right. |
Employees Columns
Column | Description |
|---|---|
First Name | Employee’s first name as it appears in the source record. |
Last Name | Employee’s last name as it appears in the source record. |
Payroll ID | Employee’s Workday employee ID. |
Hire Date | Hire date as it appears in R365. |
Status | Active status for the employee as it appears in the source record. |
ID | The employee’s unique id for the source record.
|
Link Employee | Employees mapped to the source record.
Click to change the associated employee mapping.
|