This article is part of the Fixed Assets Module training. Click here for more information on the Fixed Assets module and here for more information on the Asset record where the actions can be performed.
The Asset 'Actions' menu appears after an Asset draft has been saved for the first time. Action options will vary depending on the status of the Asset and include the following actions:

Duplicate -
- Available on all statuses. The 'Duplicate' action creates a modified copy of the Asset in a new tab, which will have a generated number value aggregated as if the User had selected to create a new Asset. The User can then make any necessary changes and save the new Asset under an updated name
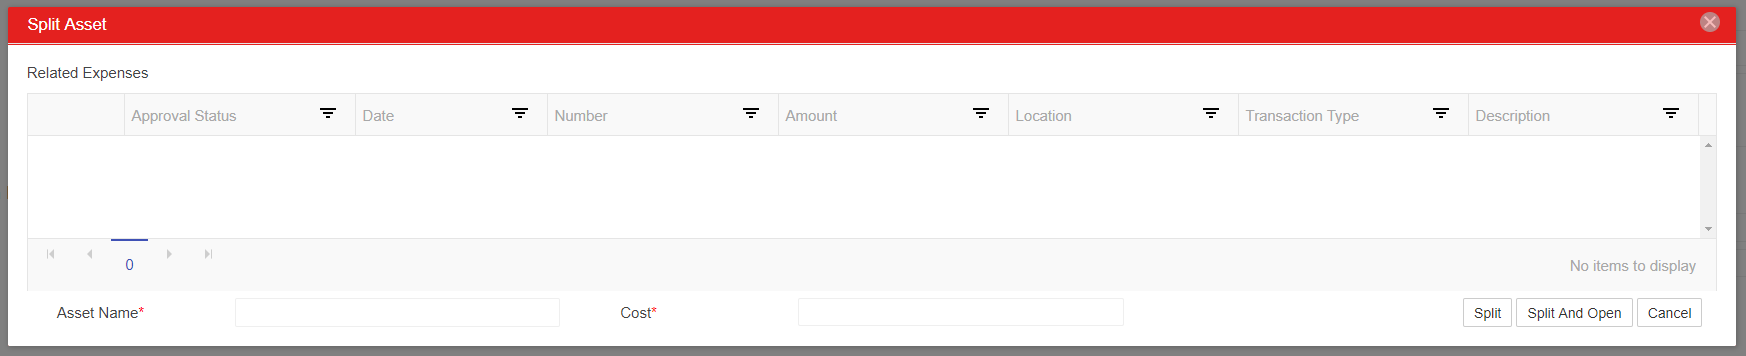
Split -
Available on 'Draft' and 'CIP' Assets. The 'Split' action can be used to split a single Asset into two separate Assets. Upon selecting the 'Split' Action, the Split prompt will open where the User can review expenses related to the Asset, then enter the second Asset's name and cost
Clicking 'Split' will save the Split, update the 'Current Cost' of the first Asset, and close the prompt
Clicking 'Split And Open' will save the Split, update the 'Current Cost' of the first Asset and open the second Asset record where the 'Cost' amount will be the 'Current Cost'
'Cancel' will close the Split prompt without performing any actions

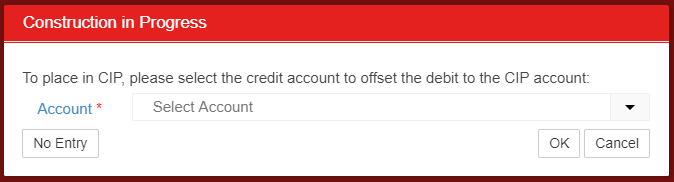
Begin Construction-
Available on 'Draft' Assets. The 'Begin Construction' Action can be used to update the Status of an Asset from 'Draft' to 'CIP'
When selected, the 'Construction in Progress' prompt will appear where the User must select the Credit Accounts to offset the Debit to the CIP Account. Refer to CIP & Active Offset Accounts for more information on which account to select
Once the selection has been made, click 'OK' and the Asset status will be changed to 'CIP'

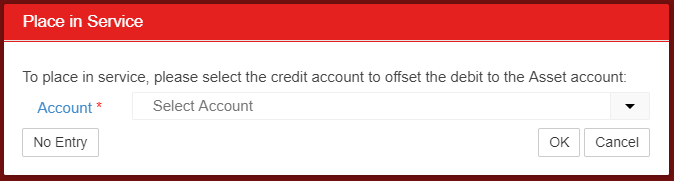
Place in Service-
Available on 'Draft' and 'CIP' Assets. The 'Place in Service' action can be used to update the status of an Asset from 'Draft' or 'CIP' to 'Active'
If moving from 'Draft' directly to 'Active', the 'Place in Service' prompt will appear where the User must select the Credit Accounts to offset the Debit to the Asset Account. Refer to CIP & Active Offset Accounts for more information on which Account to Select
If moving from 'CIP' to 'Active', the Credit Account was selected when moving the 'Draft' to 'CIP'
Once the selection has been made, click 'OK' and the Asset status will be changed to 'Active'

Depreciate-
Available on 'Active' Assets. The 'Depreciate' action can be used to open the Depreciation form and post (or preview) Depreciation for the Asset. Refer to the Depreciation Form training for more information

Asset Disposal-
Available on 'Active' and 'Active Fully Dep.' Assets. The 'Asset Disposal' action can be used to record the disposal (and sale) of an Asset and move the Asset to the 'Retired' Status.
When selected, the 'Asset Disposal' prompt will appear where the User must select the 'Disposal Date'. If the Asset was sold, click the 'Yes' toggle to enter the 'Amount' and 'Account' of the sale. The Amount value will be recorded in the Account on the final Depreciation Journal Entry used to Retire the Asset

When each required field has been updated, click 'Process Disposal' to open the 'Confirmation' prompt


Partially Retire-
Available on 'Active' and 'Active Fully Dep.' Assets. The 'Partially Retire' action can be used to record the partial retirement (and sale) of an Asset and move the Asset to 'Retired' status.
When selected, the 'Partial Retirement' prompt will appear where the User must select the 'Partial Retirement Date' and enter the amount (of the remaining Current Cost) that will be partially retired. If the Asset was sold, click the 'Yes' toggle to enter the 'Amount' and 'Account' of the sale. The Amount value will be recorded in the account on the Depreciation Journal Entry used to partially retire the Asset

When each required field has been updated click 'Partially Retire' to open the 'Confirmation' prompt


Location Transfer-
Available on 'Active' and 'Active Fully Dep.' Assets. The 'Location Transfer' action can be used to transfer the Asset Record from one Location to another.
When selected, the 'Asset Location Transfer' prompt will appear. For all Location Transfers, the User must select the 'New Location', then enter the 'Transfer Date'.

If a sale is not associated with the Location Transfer:
Select the appropriate Credit Account to offset the debit to the new Location's Asset Account, then click 'Process Transfer' to complete the Location Transfer.
If a sale is associated with the Location Transfer:
Change the 'Is there a sale associated with the transfer of this asset?' toggle to 'Yes'. The 'Asset Location Transfer' prompt will update with new fields.

The next steps depend on whether the existing Asset should be retired or not. If the existing Asset is not being retired, the Location Transfer can be completed in the Location Transfer prompt. However, if the current Asset is being retired, the current Asset will need to be 'Disposed' and a new Asset created.
If the current Asset is not being retired:
Enter the Sale Amount
Select the appropriate Account to associate with the sale. The Sale Amount value will be recorded in this Account on the final Depreciation Journal Entry for the Asset.
Select the appropriate Credit Account to offset the debit to the new Location's Asset Account
Click 'Process Transfer' to complete the Location Transfer
If the current Asset is being retired:
The following instructions are for when the retirement of the Asset for the original Location and the acquisition of the Asset for the new Location need to be recorded. If you need to show a retirement of the asset for the original location and the acquisition of the asset for the new locations
Click 'Cancel' to exit the Location Transfer prompt
Click 'Action', then 'Asset Disposal'. The Asset Disposal prompt will open

Enter the 'Disposal Date', select whether or not there was a sale associated with the Asset disposal, then click 'Process Disposal'. Learn more about Asset Disposal above.

Now that the asset has been disposed of for the original Location, create a new Asset for the receiving Location.
Open the Create Menu, then select Asset.
Now, that you have disposed of the asset for the original location, create a new asset for the receiving location.On the new Asset record enter all of the Asset InformationEnter all of the Asset information on the new Asset Record

The Acquisition Date should be the same as the Disposal Date that was used, and Acquisition Cost should be the same as the Sale Amount
Confirm the Depreciation Method, Conventionand Effective Life are correct before saving the asset.On the 'Books' tab, confirm that the Depreciation Method, Convention, and Effective Life are correct before saving the Asset

Click 'Save', then select 'Save' to save without closing. The 'Action' button will then appear.

Click 'Action', then select 'Place in Service' to place the new Asset into service. Learn more about the 'Place in Service' action above.

Select the Bank Account that provided the funds for the purchase of this Asset.

'No Entry' should not be selected in this case
Select ‘Ok’. The Asset Transfer is now complete and will be reflected for reporting purposes.
Depreciation Report-
Available on 'Active', 'Active Fully Dep', and 'Retired' Assets. The 'Depreciation Report' action can be used to open the Depreciation Report for the Asset
When selected, the Depreciation Posting report will open in a new tab. This is the same report that loads from the Depreciation form. The report breaks out Depreciation totals by Asset Class and Assets within the Class. When run from the 'Action' menu, only this Asset will be included in the report. To view the report with multiple Assets, run it from the Depreciation form
Users can update the report parameters to view either the 'Unposted' depreciation or 'Posted' depreciation
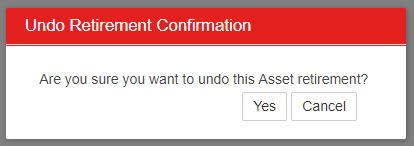
Undo Retirement-
Available on 'Retired' Assets only. The 'Undo Retirement' action can be used to reverse the 'Asset Disposal' action. If you need to undo a Partial Retirement, you must first fully retire the Asset, then you can 'Undo Retirement' for the full amount
When selected, the 'Undo Retirement Confirmation' prompt will appear where the User can select 'Yes' or 'Cancel'
When 'Yes' is clicked, the Asset Retirement will be undone and the Asset status will change from 'Retired' to 'Active'. Any remaining depreciation postings will be regenerated in the 'Postings' tab

Click here to return to the Asset record training page.