
Missing items are automatically created in Restaurant365 when an AP transaction is imported or entered and includes a Vendor Item Number that does not exist.
The following are scenarios in which a missing item would be created:
An invoice includes a new product that has not been previously purchased and therefore does not exist in the system.
The vendor discontinued a product and replaced the product with a similar product or different brand.
The vendor changed the item number of the product.
An invoice includes a different unit of packaging that uses a different item number.
For issues #1 and #2, a new purchased item must be created.
All four issues require that the new vendor item is assigned to a purchased item.
For a quick view into AP transactions that have missing items, review the Missing Items column in AP Transactions. Transactions with missing items will be flagged with a Yes in this column.

Missing Item Solutions
Missing items can be assigned using the following methods:
On the Missing Items tab of the AP Invoice record
To-do Checklist - Record Setup tab
Vendor Item list
The easiest method is on the AP invoice record. The other two methods allow you to open the Vendor Item Record and perform a manual update.
Identify a Missing Item

When entering an AP invoice or credit memo, select the Details tab.
From the Item drop-down, select Missing Item.
This allows the user to complete the invoice or credit memo.Complete the invoice or credit memo and select an option from the Save menu to save changes to the document.
A user with the appropriate permissions can then review the document and assign the missing item on the Missing Items tab.
See steps below for more information.
Assign a Missing Item
After saving an AP invoice or credit memo that contains a missing item, the Missing Items tab appears.
When entering an AP invoice or credit memo, select the Missing Items tab.
Select the Assign button next to the missing vendor item.
The Vendor Item Assign window appears.
Review the Vendor Item Name to determine if a similar purchased item already exists in Restaurant365.
If the item already exists, select the purchased item from the Item list.
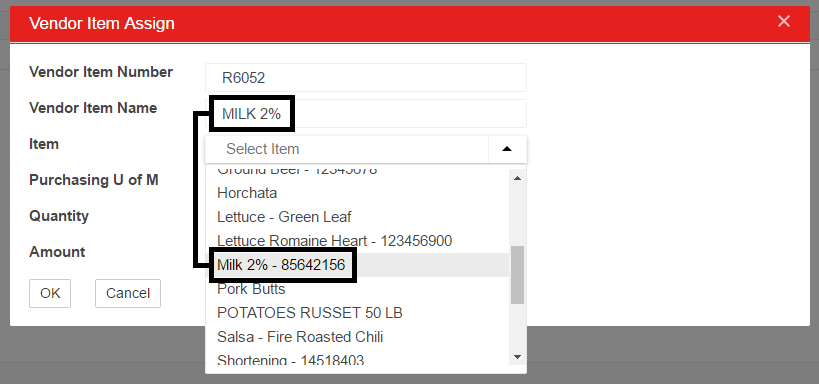
If the item does not already exist, enter the name of the purchased item in the Item field and hit Enter.
A quick-add prompt asks if you want to add a new item. Select Item to add a purchased item or select Vendor Item to add a vendor item.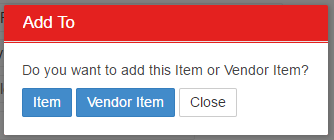
Complete and Save the new item record.
Some fields, including the Vendor Item Number, Vendor Item Name, and Quantity populate with information already provided. Review pre-populated information and complete additional fields as necessary, including:
Purchasing U of M
Split U of M
Total Amount
.png?sv=2026-02-06&spr=https&st=2026-07-14T03%3A54%3A15Z&se=2026-07-14T04%3A07%3A15Z&sr=c&sp=r&sig=3%2FXI9HaZofcFZLunoA1g5wZT9X994z%2B3TCNYZLTaj%2FE%3D "image(779).png")
Select OK to update and assign the new vendor item.
Once assigned, the vendor item no longer appears on the Missing Items list.Continue this process until all missing items are assigned.
To-Do Checklist
Review the To Do Checklist and update the missing item records:
Open the To-Do checklist and select the Record Setup tab.

For each Vendor Item record type, click on Missing Record Name to open the Vendor Item record and update accordingly.
Continue the process until there are no remaining items on the Record Setup tab.
Vendor Items List
Update missing item records from the Vendor Items list:
Open the Vendor Items page in the Inventory application.

Filter the Vendor column to include only the vendor of the AP invoice with missing items.
This step can also be performed through the Import Tool. In place of opening each record in Step 3, export the list and update the missing values (Item, Purchase U of M, Split U of M, Contract Price, Split Contract Price, Contract Expiration and Acceptable Variance %). Save the file as a .CSV and then use the Import Tool to perform an Update Existing on Vendor Item records.