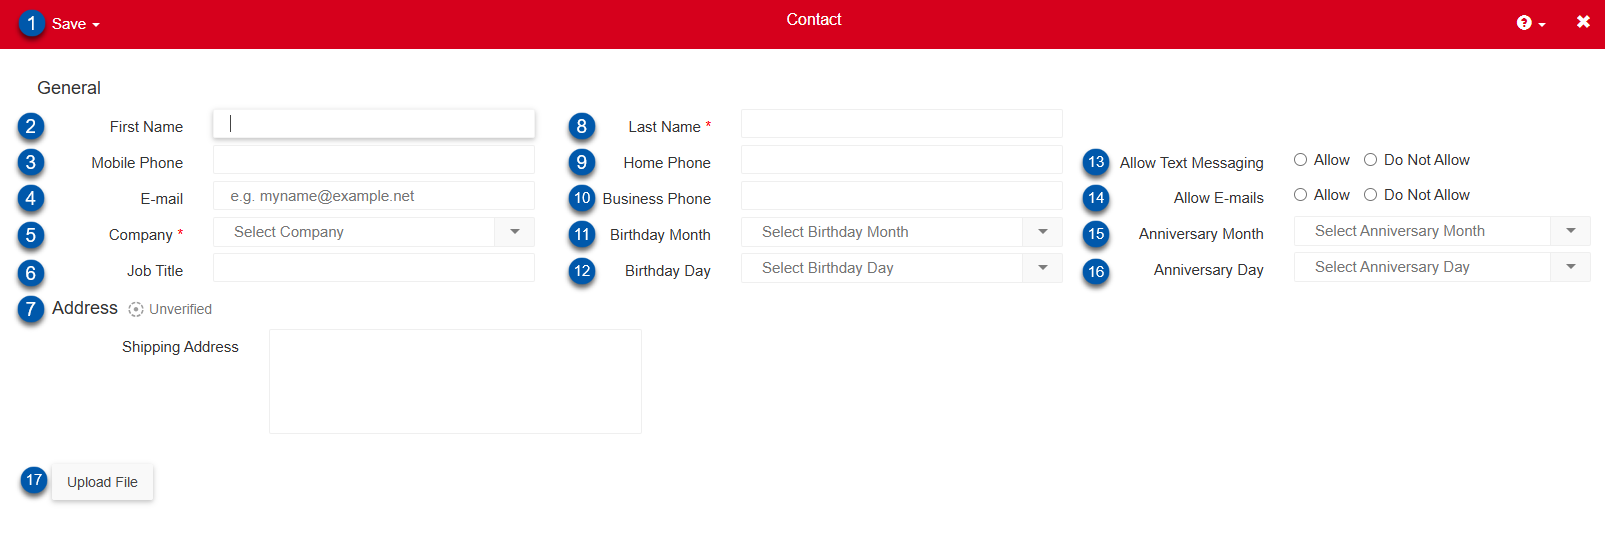
The contact record stores additional information for contacts linked to other records, including the AR Customer Record, the Franchisee Location Record, and the Vendor Record. Users can save addresses, phone numbers, and other contact details which can be accessed and created directly from the associated record.
Navigation
Contact records are viewable on the individual records they are linked to:
Security
Contact Permissions are found in the permission tree as follows:
Administration
Contacts
View Contacts
Edit Contacts
Create Contacts
Delete Contacts
Users will only be permitted to create or view contacts on records they have access to.
These permissions can be added to custom user roles or individual users. The Permission Access report can be used to determine which user roles or users already have these permissions assigned. For more information, see User Setup and Security.
Buttons and Fields

Button/Field | Description | |
|---|---|---|
1 | Save | Click to open the save menu with the following options:
|
2 | First Name | The first name of the contact. |
3 | Mobile Phone | The mobile phone number of the contact. |
4 | The email address of the contact. | |
5 | Company | The company of the contact. Click to open a dropdown menu of companies in R365. Company options include vendors, AR customers, and Franchisee Locations. Selecting a company, will link the contact to the selected company. |
6 | Job Title | The job title of the contact. |
7 | Address | Shipping address of the contact. This should include the street address, city, postal code, and country.
|
8 | Last Name | The last name of the contact. |
9 | Home Phone | The home phone number of the contact. |
10 | Business Phone | The business phone number of the contact. |
11 | Birthday Month | The birthday month of the contact. Click to open the dropdown and select the month. |
12 | Birthday Day | The birthday day of the contact. Click to open the dropdown and select the day. |
13 | Allow Text Messaging | Allow: The contact can be contacted via text message. Do Not Allow: The contact cannot be contacted via text message. |
14 | Allow E-mails | Allow: The contact can be contacted via text email. Do Not Allow: The contact cannot be contacted via email. |
15 | Anniversary Month | The anniversary month of the contact. Click to open the dropdown and select the month. |
16 | Anniversary Day | The anniversary month of the contact. Click to open the dropdown and select the month. |
17 | Upload File | Click to open the file selector prompt and select a file to be attached to the record. |