Please refer to the AP Automation Overview for steps on how to set up AP Automation.
AP Automation is a feature within Restaurant365 where Vendors are able to directly send invoices straight to your R365 instance via a unique email address generated from Restaurant365. Necessary Vendor email addresses will need to be whitelisted on the 'AP Processing Email' tab of System Preferences so that only trusted sources have access to submitting documents. When emails are sent, the attached invoices (PDF, PNG, JPG) will be imported into the Documents to Process list. Each separate Attachment will be imported as a separate Document to Process.
Currently, User-created email addresses can also be utilized as a third party email account that Restaurant365 will monitor via POP3. Many Restaurant365 Customers utilize Gmail or the Google G Suite for their email needs. In order to utilize a Gmail (or G Suite) Email address with the AP Automation feature in Restaurant365, various settings need to be in place on the specified Email Address.
To enable this email address for monitoring, the following settings must be updated.
Enable POP Forwarding
POP Forwarding must be enabled on the Gmail address that will be monitored by Restaurant365. Click here for Google's instructions on how to enable POP forwarding in Gmail or follow the detailed instructions below.
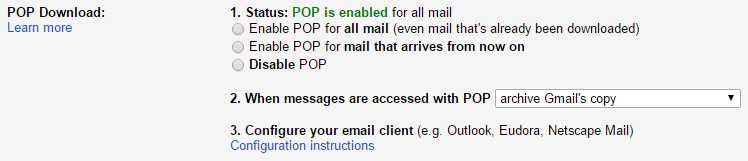
In addition to enabling POP Forwarding, the Gmail setting '2. When messages are accessed with POP:' should be set to 'archive Gmail's copy'
Step 1: Open Gmail Settings

Step 2: Navigate to 'Forwarding and POP/IMAP

Step 3: Enable POP

-
Click the 'Enable POP for all mail' radio button
-
Set the 'When messages are accessed with POP' setting to 'archive Gmail's copy'
-
Click 'Save Changes'
Step 4: Review Changes
Clicking the 'Save Changes' button will close Gmail Settings. Reopen the settings and navigate to the 'Forwarding and POP/IMAP' tab to confirm that the POP settings match the values below.
Enable Less Secure Apps
In order for the AP Automation feature to access Gmail via POP, 'Less Secure Apps' must be enabled. Click here for Google's instructions on how to Enable Less Secure Apps, or follow the detailed instructions below.
Step 1: Open Your 'Google Account'

When logged in to Gmail, navigate to the top right corner of the browser window and click on the User Icon. This will open the User Info prompt. Click on 'Google Account' to open the Account Settings.
Step 2: Navigate to the 'Security' Pane

On the far left side, click the 'Security' tab to take you to your Security Settings.
Step 3: Navigate to the 'Connected apps & sites' Subsection

Scroll down to the 'Less secure app access' subsection and locate the 'Turn on access (not recommended)' setting.

Ensure that upon clicking the toggle, 'Allow less secure apps: ON' is displayed as shown above.
Disable 2-Step Verification (if previously enabled)
2-step Verification is a feature in Gmail that must be disabled in order to utilize Gmail with AP Automation. Click here for Google's instructions on how to Disable 2-Step Verification, or follow the instructions below.
Step 1: Remain on the 'Security' Screen and Locate the 'Signing in to Google' Subsection

While on the same 'Sign-in & security' screen, locate the 'Signing in to Google' Subsection and click the '2-Step Verification' settings. If 'Off' is the current setting, no further action is required. If 'On' is the current setting, click through the arrow on the right to open the setting and click 'Turn Off'.
Change your Password
You will then need to manually update your password. Ensure that this new password is correctly entered into the Email Settings of your User record as well.
Google Security Alerts
Step 1: Receive the 'Security Alert' email and open the notification from your inbox

Regardless of the security settings that are in place on your Google or G-Suite accounts, when the Account is accessed, Google will typically send a 'Security Alert' email to your inbox. This email will contain information about where the Account was accessed and on what type of device. If you receive a 'Security Alert' email, you must open the email and confirm to Google that the access was you (or in this case, authorized by you).
Step 2: Click the 'Check Activity' button in the email to open a Security Review page in a new tab

Step 3: Review the Device information, including the Location value, then click 'Yes'
R365 AP Automation services will check Google Accounts from one of our two main offices:
-
Irvine, CA
-
Austin, TX
Occasionally, due to ISP variances, the Location may list a City other than Irvine or Austin as the Location. While the city may vary slightly, the state should still be either CA or TX. If you receive a Security Alert that your Account was accessed from a foreign country, this is likely a true security alert and should be dealt with as such. Review Google's security documentation for more information about intrusions in to your Account.

If the Location value appears to be in order, click the 'Yes' button to confirm that the Access is approved. AP Automation services should resume at that point.