The Hourly Forecasting tool enables Users to generate a forecast based on the likely distribution of Sales Ticket data throughout the day. Hourly Forecasting can then be further customized to display expected Sales increases and, thus, Labor increases. User-created day parts set on the 'Day Parts' tab of the Labor Matrix will appear on this screen to assist in customizing the forecast.
Hourly Forecasts can be created after the Labor Matrix is set up and the Daily Sales Forecast is complete. Once a forecast is approved, it will be posted to the Schedule to ensure that the correct amount of Employees are working the hour amounts allocated for each Job.
Approving the Forecast from the Hourly tab will add additional steps when editing the Forecast for the day on the Monthly and Daily tabs.
This feature is only available when Smart Labor is enabled for your database. Contact your CSM or R365 Support to learn how Smart Labor can enhance your R365 experience!
Create an Hourly Forecast
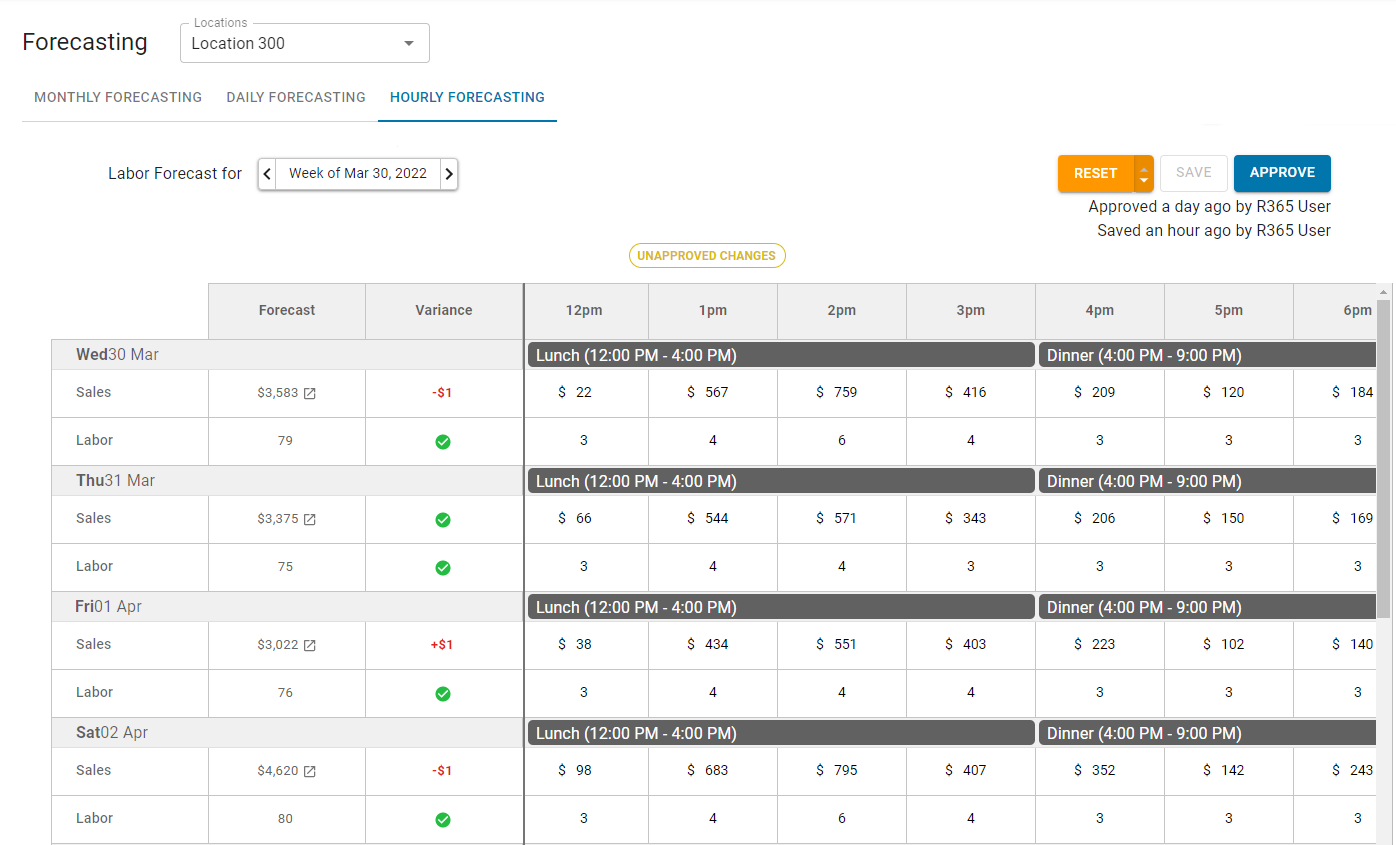
Navigate to the 'Hourly Forecasting' tab of the Forecasting Lists page. When the screen opens, a grid will be listed for the set date. Update the date to the week that will be forecasted.
Days that have passed will be greyed out and disabled from editing.

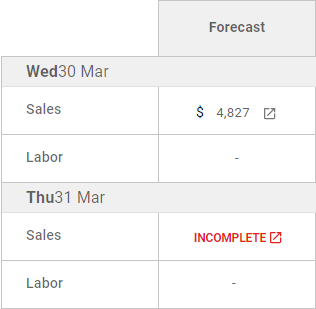
The grid will display Sales amounts if the Daily Forecasts were completed for the week. If a Daily Forecast was not complete for a day, then will be displayed.
Review the listed Sales Forecasts to ensure that the Sales amounts are correct. If incorrect and/or marked as 'Incomplete', click the corresponding Source Link to navigate to the Daily Forecast. Create and save your Sales Forecast and return back to the Hourly Forecasting grid where your saved Forecast will now be listed.
When all days have a Sales forecast listed, click the  button above the grid to populate the grid with both Sales and Labor forecasts by hour.
Ensure that the Labor Matrix is completed before creating the first Hourly Forecast, as that matrix contributes to forecasting Labor.

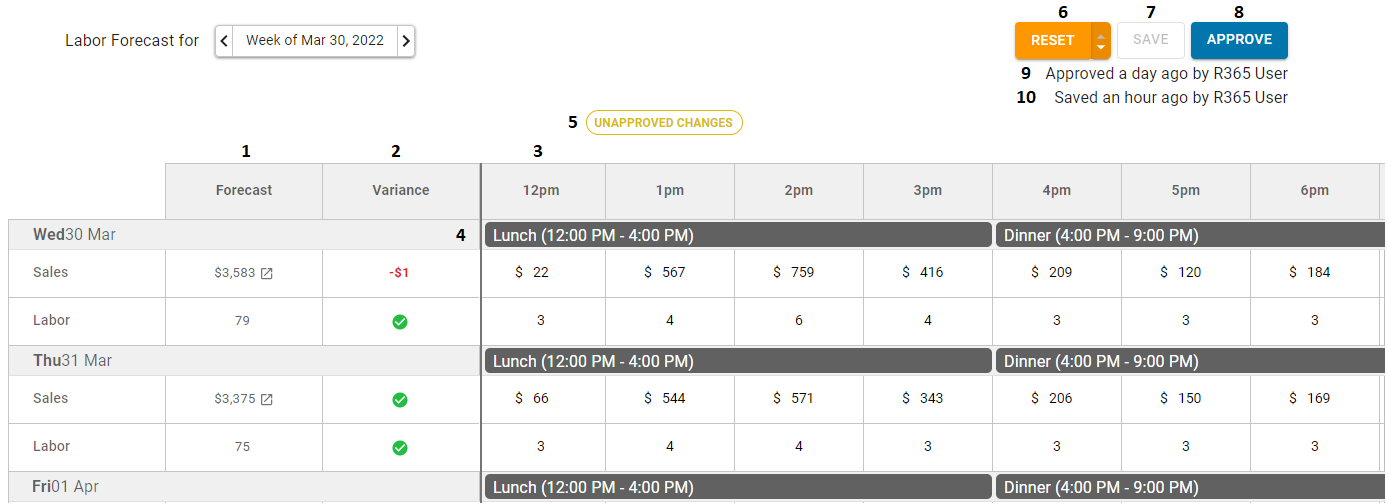
1) Forecast - The Sales and Labor forecast for the date listed
Sales - This is the Sales Forecast configured by either the Daily Forecast
Labor - This is the Labor Forecast configured by the the Labor Matrix and based on the Sales Forecast. The amount displayed is the number of Employees needed per hour totaled for that day
2) Variance - The difference between the amount forecasted and the amount entered in the Labor Forecast grid. One of two options will be displayed:
+/- Amount - The amount increased or decreased from the original number forecasted. This amount is displayed in red. For Sales data, +/-$1 is typical due to rounding
Check Mark - No difference exists between the forecasted amount and the actual amount
3) Hourly Forecast - The amount forecasted for that hour. The hour slots outside of Operating Hours should be grayed out
Sales - This amount is based on the following calculation, which is explained in the example of forecasting labor for 3 pm to 4 pm on a given Wednesday:
Total all Sales tickets from between 3 pm to 4 pm on the 8 prior Wednesdays ($1,084.35)
Divide this sum by Total Sales for all 8 prior Wednesdays ($34,026.55)
Take the resulting percentage (3.19%) and multiply it by the day's Sales Forecast for the Wednesday being forecasted ($3,223)
Round the result ($102.81) to the nearest dollar
Display the rounded result ($103) on the Labor Forecast for the 3 pm hour on Wednesday
Labor - The number of Employees that need to be working for that hour, based on the Labor Matrix and the Sales Forecasted for that hour
4) Day Parts - The created Daypart names and times for each day, depending on the Daypart structure set up on the 'Day Parts' tab of the Labor Matrix
5) 'Unapproved Changes' Alert - This alert will only display when a forecast has been saved but not approved
6) Reset / Delete - The 'Reset' button will function when the generated forecast has been edited. Click this button to revert the updated forecast to the original generated forecast. To remove the generated forecast entirely, click the down arrow next to 'Reset' and then click 'Delete'
This function cannot be undone
7) Save - This button will Save any updates made to the Labor Forecast
8) Approve - This button will Approve the Labor Forecast. Once Approved, the forecast will be transferred to the Schedule
9) Approved Time Stamp - This will indicate when and who approved the last forecast
10) Saved Time Stamp - This will indicate when and who saved the last forecast
Review both the Sales and Labor forecasts that populated the screen. If a certain day's forecasts need to be further adjusted, continue on to the following section. When you are satisfied with the forecast, click 'Save' or 'Approve', depending on your Permissions.
Approving a forecast will post it to the Schedule Calendar. Additional edits can be made and re-Approved after an initial forecast is complete.
Customizing an Hourly Forecast
An Hourly Forecast can be further customized to reflect a predicted fluctuation in Sales, such as a holiday rush or coupon drop.

To do this, click the amount of Hourly Sales and Labor forecasts and adjust accordingly by typing in a new amount. Any changes made will be displayed in blue and reflected in the variance. Hovering over an hourly Sales and Labor forecast will display the original amount listed.
When a customized Hourly Forecast is Approved, the updated amounts will still be reflected in the Sales Variance, but not the Labor Variance, as that has now been marked as Approved with a check mark.
Hourly Entree Forecast
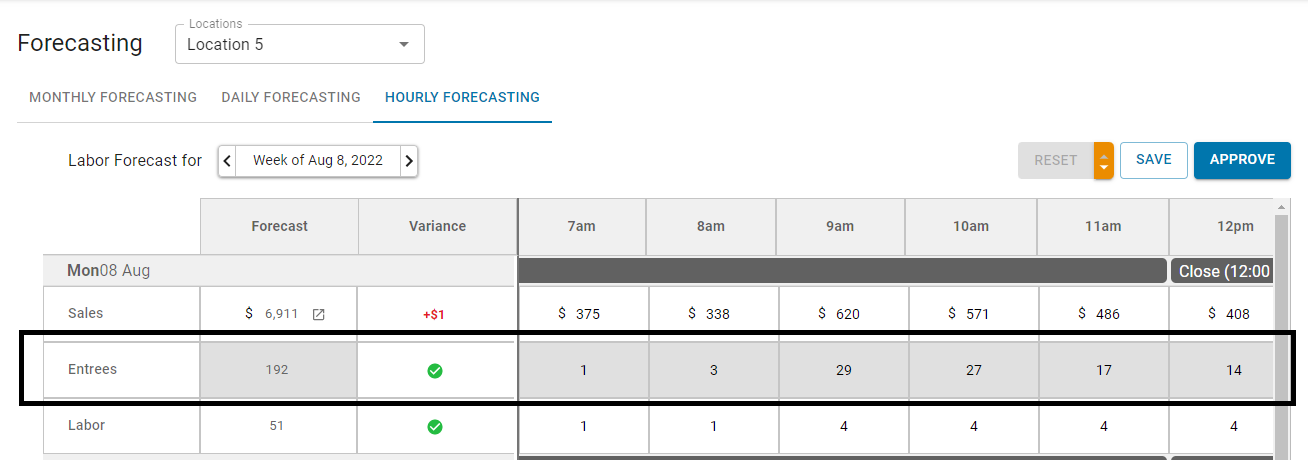
If the Variable Labor Matrix is set to use Entrees instead of Sales, an additional row displaying the Entree Forecast will be displayed.

The Entree Forecast is generated based on an Entree Modifier that is applied to the Forecasted Sales Amount. For this reason, the Entree Forecast is not editable; however, editing the Forecasted Sales Amount will update the Entree Forecast.
